344 lines
16 KiB
Markdown
344 lines
16 KiB
Markdown
|
|
Flutter 1.17 对比上一个稳定版本,更多是带来了性能上的提升,其中一个关键的优化点就是 `Navigator` 的内部逻辑,本篇将带你解密 `Navigator` 从 1.12 到 1.17 的变化,并介绍 Flutter 1.17 上究竟优化了哪些性能。
|
|||
|
|
|
|||
|
|
|
|||
|
|
## 一、Navigator 优化了什么?
|
|||
|
|
|
|||
|
|
在 1.17 版本最让人感兴趣的变动莫过于:**“打开新的不透明页面之后,路由里的旧页面不会再触发 `build`”**。
|
|||
|
|
|
|||
|
|
虽然之前介绍过 `build` 方法本身很轻,但是在“不需要”的时候“不执行”明显更符合我们的预期,而这个优化的 PR 主要体现在 `stack.dart` 和 `overlay.dart` 两个文件上。
|
|||
|
|
|
|||
|
|
- `stack.dart` 文件的修改,只是为了将 `RenderStack` 的相关逻辑变为共享的静态方法 `getIntrinsicDimension` 和 `layoutPositionedChild ` ,其实就是共享 `Stack` 的部分布局能力给 `Overlay` 。
|
|||
|
|
|
|||
|
|
- `overlay.dart` 文件的修改则是这次的灵魂所在。
|
|||
|
|
|
|||
|
|
|
|||
|
|
## 二、Navigator 的 Overlay
|
|||
|
|
|
|||
|
|
事实上我们常用的 `Navigator` 是一个 `StatefulWidget`, 而常用的 `pop` 、`push` 等方法对应的逻辑都是在 `NavigatorState` 中,而 **`NavigatorState` 主要是通过 `Overlay` 来承载路由页面,所以导航页面间的管理逻辑主要在于 `Overlay`**。
|
|||
|
|
|
|||
|
|
### 2.1、Overlay 是什么?
|
|||
|
|
|
|||
|
|
`Overlay` 大家可能用过,在 Flutter 中可以通过 `Overlay` 来向 `MaterialApp` 添加全局悬浮控件,这是因为`Overlay` 是一个类似 `Stack` 层级控件,但是它可以通过 `OverlayEntry` 来独立地管理内部控件的展示。
|
|||
|
|
|
|||
|
|
比如可以通过 `overlayState.insert` 插入一个 `OverlayEntry` 来实现插入一个图层,而`OverlayEntry` 的 `builder` 方法会在展示时被调用,从而出现需要的布局效果。
|
|||
|
|
|
|||
|
|
```
|
|||
|
|
var overlayState = Overlay.of(context);
|
|||
|
|
var _overlayEntry = new OverlayEntry(builder: (context) {
|
|||
|
|
return new Material(
|
|||
|
|
color: Colors.transparent,
|
|||
|
|
child: Container(
|
|||
|
|
child: Text(
|
|||
|
|
"${widget.platform} ${widget.deviceInfo} ${widget.language} ${widget.version}",
|
|||
|
|
style: TextStyle(color: Colors.white, fontSize: 10),
|
|||
|
|
),
|
|||
|
|
),
|
|||
|
|
);
|
|||
|
|
});
|
|||
|
|
overlayState.insert(_overlayEntry);
|
|||
|
|
```
|
|||
|
|
|
|||
|
|
### 2.2、Overlay 如何实现导航?
|
|||
|
|
|
|||
|
|
在 `Navigator` 中其实也是使用了 `Overlay` 实现页面管理,**每个打开的 `Route` 默认情况下是向 `Overlay` 插入了两个 `OverlayEntry`**。
|
|||
|
|
|
|||
|
|
> 为什么是两个后面会介绍。
|
|||
|
|
|
|||
|
|
而在 `Overlay` 中, `List<OverlayEntry> _entries` 的展示逻辑又是通过 `_Theatre` 来完成的,在 `_Theatre` 中有 `onstage` 和 `offstage` 两个参数,其中:
|
|||
|
|
|
|||
|
|
- `onstage` 是一个 `Stack`,用于展示 `onstageChildren.reversed.toList(growable: false)` ,也就是可以被看到的部分;
|
|||
|
|
- `offstage` 是展示 `offstageChildren` 列表,也就是不可以被看到的部分;
|
|||
|
|
|
|||
|
|
```
|
|||
|
|
return _Theatre(
|
|||
|
|
onstage: Stack(
|
|||
|
|
fit: StackFit.expand,
|
|||
|
|
children: onstageChildren.reversed.toList(growable: false),
|
|||
|
|
),
|
|||
|
|
offstage: offstageChildren,
|
|||
|
|
);
|
|||
|
|
```
|
|||
|
|
|
|||
|
|
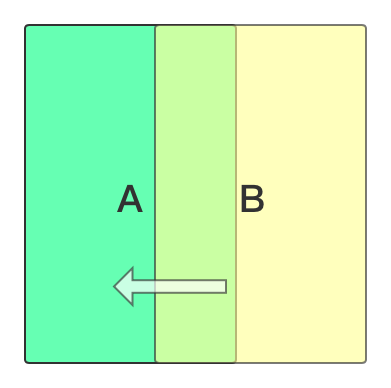
简单些说,比如此时有 [A、B、C] 三个页面,那么:
|
|||
|
|
|
|||
|
|
- C 应该是在 `onstage` ;
|
|||
|
|
- A、B 应该是处于 `offstage` 。
|
|||
|
|
|
|||
|
|
当然,A、B、C 都是以 `OverlayEntry` 的方式被插入到 `Overlay` 中,而 A 、B、C 页面被插入的时候默认都是两个 `OverlayEntry` ,也就是 [A、B、C] 应该有 6 个 `OverlayEntry`。
|
|||
|
|
|
|||
|
|
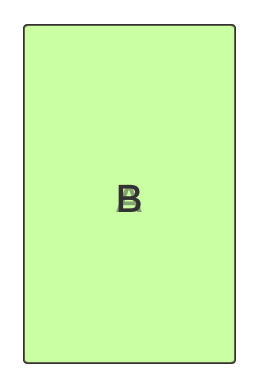
举个例子,程序在默认启动之后,首先看到的就是 A 页面,这时候可以看到 `Overlay` 中
|
|||
|
|
|
|||
|
|
- `_entries` 长度是 2,即 `Overlay` 中的列表总长度为2;
|
|||
|
|
- `onstageChildren` 长度是 2,即当前可见的 `OverlayEntry` 是2;
|
|||
|
|
- `offstageChildren` 长度是 0,即没有不可见的 `OverlayEntry`;
|
|||
|
|
|
|||
|
|

|
|||
|
|
|
|||
|
|
这时候我们打开 B 页面,可以看到 `Overlay` 中:
|
|||
|
|
|
|||
|
|
- `_entries` 长度是 4,也就是 `Overlay` 中多插入了两个 `OverlayEntry`;
|
|||
|
|
- `onstageChildren` 长度是 4,就是当前可见的 `OverlayEntry` 是 4 个;
|
|||
|
|
- `offstageChildren` 长度是 0,就是当前还没有不可见的 `OverlayEntry`。
|
|||
|
|
|
|||
|
|

|
|||
|
|
|
|||
|
|
其实这时候 `Overlay` 处于页面打开中的状态,也就是 A 页面还可以被看到,B 页面正在动画打开的过程。
|
|||
|
|
|
|||
|
|
|
|||
|
|
|
|||
|
|
|
|||
|
|
接着可以看到 `Overlay` 中的 `build` 又再次被执行:
|
|||
|
|
|
|||
|
|
- `_entries` 长度还是 4;
|
|||
|
|
- `onstageChildren` 长度变为 2,即当前可见的 `OverlayEntry` 变成了 2 个;
|
|||
|
|
- `offstageChildren` 长度是 1,即当前有了一个不可见 `OverlayEntry`。
|
|||
|
|
|
|||
|
|

|
|||
|
|
|
|||
|
|
这时候 B 页面其实已经打开完毕,所以 `onstageChildren` 恢复为 2 的长度,也就是 B 页面对应的那两个 `OverlayEntry`;而 A 页面不可见,所以 A 页面被放置到了 `offstageChildren`。
|
|||
|
|
|
|||
|
|
> 为什么只把 A 的一个 `OverlayEntry` 放到 `offstageChildren`?这个后面会讲到。
|
|||
|
|
|
|||
|
|
|
|||
|
|
|
|||
|
|
|
|||
|
|
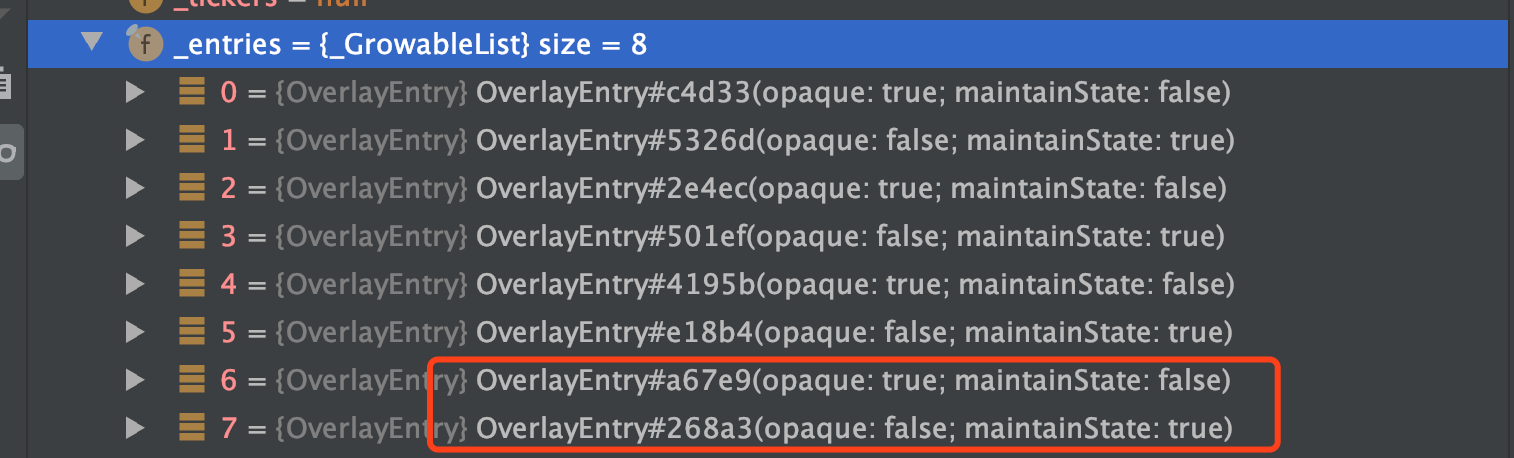
接着如下图所示,再打开 C 页面时,可以看到同样经历了这个过程:
|
|||
|
|
|
|||
|
|
- `_entries` 长度变为 6;
|
|||
|
|
- `onstageChildren` 长度先是 4 ,之后又变成 2 ,因为打开时有B 和 C 两个页面参与,而打开完成后只剩下一个 C 页面;
|
|||
|
|
- `offstageChildren` 长度是 1,之后又变为 2,因为最开始只有 A 不可见,而最后 A 和 B 都不可见;
|
|||
|
|
|
|||
|
|

|
|||
|
|
|
|||
|
|
|
|||
|
|

|
|||
|
|
|
|||
|
|
|
|||
|
|
所以可以看到,每次打开一个页面:
|
|||
|
|
|
|||
|
|
- 先会向 `_entries` 插入两个 `OverlayEntry`;
|
|||
|
|
- 之后会先经历 `onstageChildren` 长度是 4 的页面打开过程状态;
|
|||
|
|
- 最后变为 `onstageChildren` 长度是 2 的页面打开完成状态,而底部的页面由于不可见所以被加入到 `offstageChildren` 中;
|
|||
|
|
|
|||
|
|
|
|||
|
|
### 2.3、Overlay 和 Route
|
|||
|
|
|
|||
|
|
*为什么每次向 `_entries` 插入的是两个 `OverlayEntry` ?*
|
|||
|
|
|
|||
|
|
这就和 `Route` 有关,比如默认 `Navigator` 打开新的页面需要使用 `MaterialPageRoute` ,而生成 `OverlayEntry` 就是在它的基类之一的 `ModalRoute` 完成。
|
|||
|
|
|
|||
|
|
在 `ModalRoute` 的 `createOverlayEntries` 方法中,通过 `_buildModalBarrier` 和 `_buildModalScope` 创建了两个 `OverlayEntry` ,其中:
|
|||
|
|
|
|||
|
|
- `_buildModalBarrier` 创建的一般是蒙层;
|
|||
|
|
- `_buildModalScope` 创建的 `OverlayEntry` 是页面的载体;
|
|||
|
|
|
|||
|
|
**所以默认打开一个页面,是会存在两个 `OverlayEntry` ,一个是蒙层一个是页面**。
|
|||
|
|
|
|||
|
|
```
|
|||
|
|
@override
|
|||
|
|
Iterable<OverlayEntry> createOverlayEntries() sync* {
|
|||
|
|
yield _modalBarrier = OverlayEntry(builder: _buildModalBarrier);
|
|||
|
|
yield OverlayEntry(builder: _buildModalScope, maintainState: maintainState);
|
|||
|
|
}
|
|||
|
|
```
|
|||
|
|
----
|
|||
|
|
|
|||
|
|
*那么一个页面有两个 `OverlayEntry` ,但是为什么插入到 `offstageChildren` 中的数量每次都是加 1 而不是加 2?*
|
|||
|
|
|
|||
|
|
如果单从逻辑上讲,按照前面 [A、B、C] 三个页面的例子,`_entries` 里有 6 个 `OverlayEntry`, 但是 B、C 页面都不可见了,把 B、C 页面的蒙层也捎带上不就纯属浪费了?
|
|||
|
|
|
|||
|
|
|
|||
|
|
如从代码层面解释,在 `_entries` 在倒序 `for` 循环的时候:
|
|||
|
|
|
|||
|
|
- 在遇到 `entry.opaque` 为 `ture` 时,后续的 `OverlayEntry` 就进不去 `onstageChildren` 中;
|
|||
|
|
- `offstageChildren` 中只有 `entry.maintainState` 为 `true` 才会被添加到队列;
|
|||
|
|
|
|||
|
|
```
|
|||
|
|
@override
|
|||
|
|
Widget build(BuildContext context) {
|
|||
|
|
final List<Widget> onstageChildren = <Widget>[];
|
|||
|
|
final List<Widget> offstageChildren = <Widget>[];
|
|||
|
|
bool onstage = true;
|
|||
|
|
for (int i = _entries.length - 1; i >= 0; i -= 1) {
|
|||
|
|
final OverlayEntry entry = _entries[i];
|
|||
|
|
if (onstage) {
|
|||
|
|
onstageChildren.add(_OverlayEntry(entry));
|
|||
|
|
if (entry.opaque)
|
|||
|
|
onstage = false;
|
|||
|
|
} else if (entry.maintainState) {
|
|||
|
|
offstageChildren.add(TickerMode(enabled: false, child: _OverlayEntry(entry)));
|
|||
|
|
}
|
|||
|
|
}
|
|||
|
|
return _Theatre(
|
|||
|
|
onstage: Stack(
|
|||
|
|
fit: StackFit.expand,
|
|||
|
|
children: onstageChildren.reversed.toList(growable: false),
|
|||
|
|
),
|
|||
|
|
offstage: offstageChildren,
|
|||
|
|
);
|
|||
|
|
}
|
|||
|
|
```
|
|||
|
|
|
|||
|
|
而在 `OverlayEntry` 中:
|
|||
|
|
|
|||
|
|
- `opaque` 表示了 `OverlayEntry` 是不是“阻塞”了整个 `Overlay`,也就是不透明的完全覆盖。
|
|||
|
|
- `maintainState` 表示这个 `OverlayEntry` 必须被添加到 `_Theatre` 中。
|
|||
|
|
|
|||
|
|
所以可以看到,当页面完全打开之后,在最前面的两个 `OverlayEntry`:
|
|||
|
|
|
|||
|
|
- 蒙层 `OverlayEntry` 的 `opaque` 会被设置为 true,这样后面的 `OverlayEntry` 就不会进入到 `onstageChildren`,也就是不显示;
|
|||
|
|
- 页面 `OverlayEntry` 的 `maintainState` 会是 `true` ,这样不可见的时候也会进入到 `offstageChildren` 里;
|
|||
|
|
|
|||
|
|
|
|||
|
|
|
|||
|
|
*那么 `opaque` 是在哪里被设置的?*
|
|||
|
|
|
|||
|
|
关于 `opaque` 的设置过程如下所示,在 `MaterialPageRoute` 的另一个基类 `TransitionRoute` 中,可以看到一开始蒙层的 `opaque` 会被设置为 `false` ,之后在 `completed` 会被设置为 `opaque` ,而 `opaque` 参数在 `PageRoute` 里就是 ` @override bool get opaque => true;`
|
|||
|
|
|
|||
|
|
|
|||
|
|
> 在 `PopupRoute` 中 `opaque` 就是 `false` ,因为 `PopupRoute` 一般是有透明的背景,需要和上一个页面一起混合展示。
|
|||
|
|
|
|||
|
|
```
|
|||
|
|
void _handleStatusChanged(AnimationStatus status) {
|
|||
|
|
switch (status) {
|
|||
|
|
case AnimationStatus.completed:
|
|||
|
|
if (overlayEntries.isNotEmpty)
|
|||
|
|
overlayEntries.first.opaque = opaque;
|
|||
|
|
break;
|
|||
|
|
case AnimationStatus.forward:
|
|||
|
|
case AnimationStatus.reverse:
|
|||
|
|
if (overlayEntries.isNotEmpty)
|
|||
|
|
overlayEntries.first.opaque = false;
|
|||
|
|
break;
|
|||
|
|
case AnimationStatus.dismissed:
|
|||
|
|
if (!isActive) {
|
|||
|
|
navigator.finalizeRoute(this);
|
|||
|
|
assert(overlayEntries.isEmpty);
|
|||
|
|
}
|
|||
|
|
break;
|
|||
|
|
}
|
|||
|
|
changedInternalState();
|
|||
|
|
}
|
|||
|
|
```
|
|||
|
|
|
|||
|
|
到这里我们就理清了页面打开时 `Overlay` 的工作逻辑,默认情况下:
|
|||
|
|
|
|||
|
|
- 每个页面打开时会插入两个 `OverlayEntry` 到 `Overlay` ;
|
|||
|
|
- 打开过程中 `onstageChildren` 是 4 个,因为此时两个页面在混合显示;
|
|||
|
|
- 打开完成后 `onstageChildren` 是 2,因为蒙层的 `opaque` 被设置为 `ture` ,后面的页面不再是可见;
|
|||
|
|
- 具备 `maintainState` 为 `true` 的 `OverlayEntry` 在不可见后会进入到 `offstageChildren`;
|
|||
|
|
|
|||
|
|
> 额外介绍下,路由被插入的位置会和 `route.install` 时传入的 `OverlayEntry` 有关,比如: `push` 传入的是 `_history`(页面路由堆栈)的 last 。
|
|||
|
|
|
|||
|
|
|
|||
|
|
## 三、新版 1.17 中 Overlay
|
|||
|
|
|
|||
|
|
*那为什么在 1.17 之前,打开新的页面时旧的页面会被执行 `build` ?* 这里面其实主要有两个点:
|
|||
|
|
|
|||
|
|
- `OverlayEntry` 都有一个 `GlobalKey<_OverlayEntryState>` 用户表示页面的唯一;
|
|||
|
|
- `OverlayEntry` 在 `_Theatre` 中会有从 `onstage` 到 `offstage` 的过程;
|
|||
|
|
|
|||
|
|
|
|||
|
|
### 3.1、为什么会 rebuild
|
|||
|
|
|
|||
|
|
因为 `OverlayEntry` 在 `Overlay` 内部是会被转化为 `_OverlayEntry` 进行工作,而 `OverlayEntry` 里面的 `GlobalKey` 自然也就用在了 `_OverlayEntry` 上,而当 `Widget` 使用了 `GlobalKey`,那么其对应的 `Element` 就会是 "Global" 的。
|
|||
|
|
|
|||
|
|
在 `Element` 执行 `inflateWidget` 方法时,会判断如果 `Key` 值是 `GlobalKey`,就会调用 `_retakeInactiveElement` 方法返回“已存在”的 `Element` 对象,从而让 `Element` 被“复用”到其它位置,而这个过程 `Element` 会从原本的 `parent` 那里被移除,然后添加到新的 `parent` 上。
|
|||
|
|
|
|||
|
|
这个过程就会触发 `Element` 的 `update` ,而 `_OverlayEntry` 本身是一个 `StatefulWidget` ,所以对应的 `StatefulElement` 的 `update` 就会触发 `rebuild` 。
|
|||
|
|
|
|||
|
|
|
|||
|
|
### 3.2、为什么 1.17 不会 rebuild
|
|||
|
|
|
|||
|
|
那在 1.17 上,为了不出现每次打开页面后还 `rebuild` 旧页面的情况,这里取消了 `_Theatre` 的 `onstage` 和 `offstage` ,替换为 `skipCount` 和 `children` 参数。
|
|||
|
|
|
|||
|
|
并且 `_Theatre` 从 `RenderObjectWidget` 变为了 `MultiChildRenderObjectWidget`,然后在 `_RenderTheatre` 中复用了 `RenderStack` 共享的布局能力。
|
|||
|
|
|
|||
|
|
```
|
|||
|
|
@override
|
|||
|
|
Widget build(BuildContext context) {
|
|||
|
|
// This list is filled backwards and then reversed below before
|
|||
|
|
// it is added to the tree.
|
|||
|
|
final List<Widget> children = <Widget>[];
|
|||
|
|
bool onstage = true;
|
|||
|
|
int onstageCount = 0;
|
|||
|
|
for (int i = _entries.length - 1; i >= 0; i -= 1) {
|
|||
|
|
final OverlayEntry entry = _entries[i];
|
|||
|
|
if (onstage) {
|
|||
|
|
onstageCount += 1;
|
|||
|
|
children.add(_OverlayEntryWidget(
|
|||
|
|
key: entry._key,
|
|||
|
|
entry: entry,
|
|||
|
|
));
|
|||
|
|
if (entry.opaque)
|
|||
|
|
onstage = false;
|
|||
|
|
} else if (entry.maintainState) {
|
|||
|
|
children.add(_OverlayEntryWidget(
|
|||
|
|
key: entry._key,
|
|||
|
|
entry: entry,
|
|||
|
|
tickerEnabled: false,
|
|||
|
|
));
|
|||
|
|
}
|
|||
|
|
}
|
|||
|
|
return _Theatre(
|
|||
|
|
skipCount: children.length - onstageCount,
|
|||
|
|
children: children.reversed.toList(growable: false),
|
|||
|
|
);
|
|||
|
|
}
|
|||
|
|
```
|
|||
|
|
|
|||
|
|
这时候等于 `Overlay` 中所有的 `_entries` 都处理到一个 `MultiChildRenderObjectWidget` 中,也就是同在一个 `Element` 中,而不是之前控件需要在 `onstage` 的 `Stack` 和 `offstage` 列表下来回切换。
|
|||
|
|
|
|||
|
|
在新的 `_Theatre` 将两个数组合并成一个 `children` 数组,然后将 `onstageCount` 之外的部分设置为 `skipCount` ,在布局时获取 `_firstOnstageChild` 进行布局,而当 `children` 发生改变时,触发的是 `MultiChildRenderObjectElement` 的 `insertChildRenderObject` ,而不会去“干扰”到之前的页面,所以不会产生上一个页面的 `rebuild` 。
|
|||
|
|
|
|||
|
|
|
|||
|
|
```
|
|||
|
|
RenderBox get _firstOnstageChild {
|
|||
|
|
if (skipCount == super.childCount) {
|
|||
|
|
return null;
|
|||
|
|
}
|
|||
|
|
RenderBox child = super.firstChild;
|
|||
|
|
for (int toSkip = skipCount; toSkip > 0; toSkip--) {
|
|||
|
|
final StackParentData childParentData = child.parentData as StackParentData;
|
|||
|
|
child = childParentData.nextSibling;
|
|||
|
|
assert(child != null);
|
|||
|
|
}
|
|||
|
|
return child;
|
|||
|
|
}
|
|||
|
|
|
|||
|
|
RenderBox get _lastOnstageChild => skipCount == super.childCount ? null : lastChild;
|
|||
|
|
```
|
|||
|
|
|
|||
|
|
最后如下图所示,在打开页面后,`children` 会经历从 4 到 3 的变化,而 `onstageCount` 也会从 4 变为 2,也印证了页面打开过程和关闭之后的逻辑其实并没发生本质的变化。
|
|||
|
|
|
|||
|
|

|
|||
|
|
|
|||
|
|

|
|||
|
|
|
|||
|
|
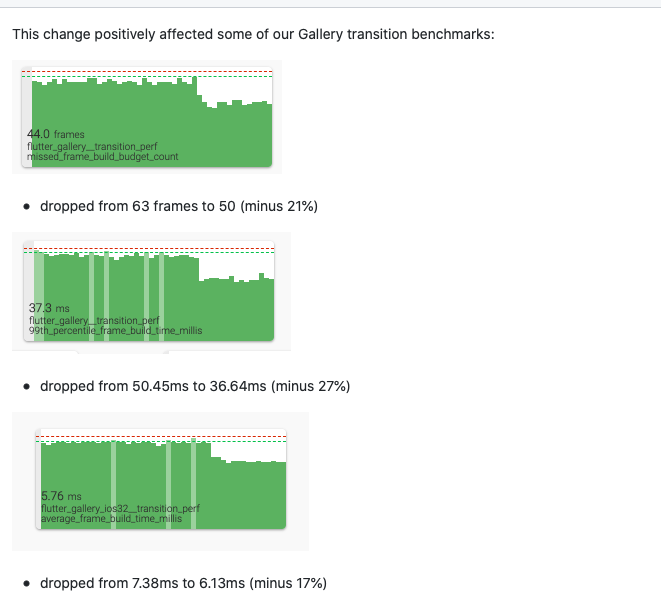
从结果上看,这个改动确实对性能产生了不错的提升。当然,这个改进主要是在不透明的页面之间生效,如果是透明的页面效果比如 `PopModal` 之类的,那还是需要 `rebuild` 一下。
|
|||
|
|
|
|||
|
|
|
|||
|
|
|
|||
|
|
|
|||
|
|
## 四、其他优化
|
|||
|
|
|
|||
|
|
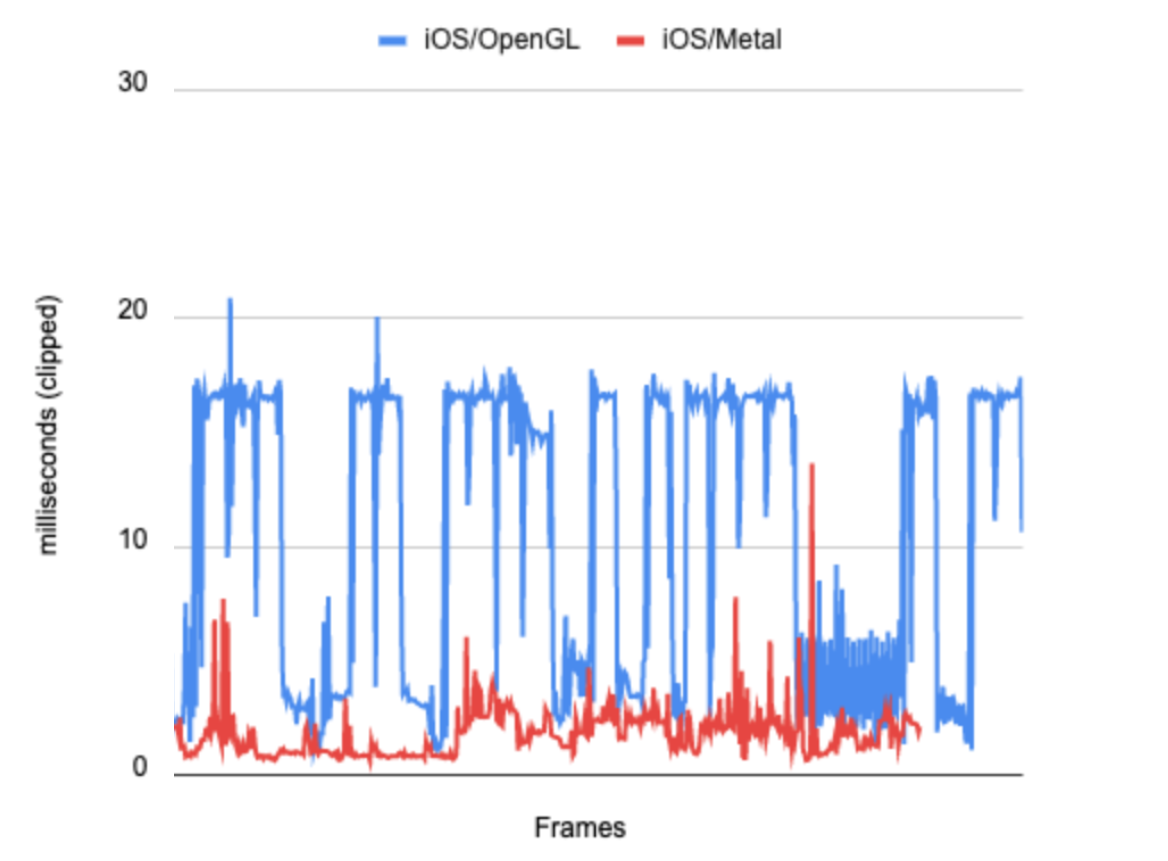
`Metal` 是 iOS 上类似于 `OpenGL ES` 的底层图形编程接口,可以在 iOS 设备上通过 api 直接操作 GPU 。
|
|||
|
|
|
|||
|
|
而 1.17 开始,Flutter 在 iOS 上对于支持 `Metal` 的设备将使用 `Metal` 进行渲染,所以官方提供的数据上看,这样可以提高 50% 的性能。更多可见:https://github.com/flutter/flutter/wiki/Metal-on-iOS-FAQ
|
|||
|
|
|
|||
|
|
|
|||
|
|
|
|||
|
|
Android 上也由于 Dart VM 的优化,体积可以下降大约 18.5% 的大小。
|
|||
|
|
|
|||
|
|
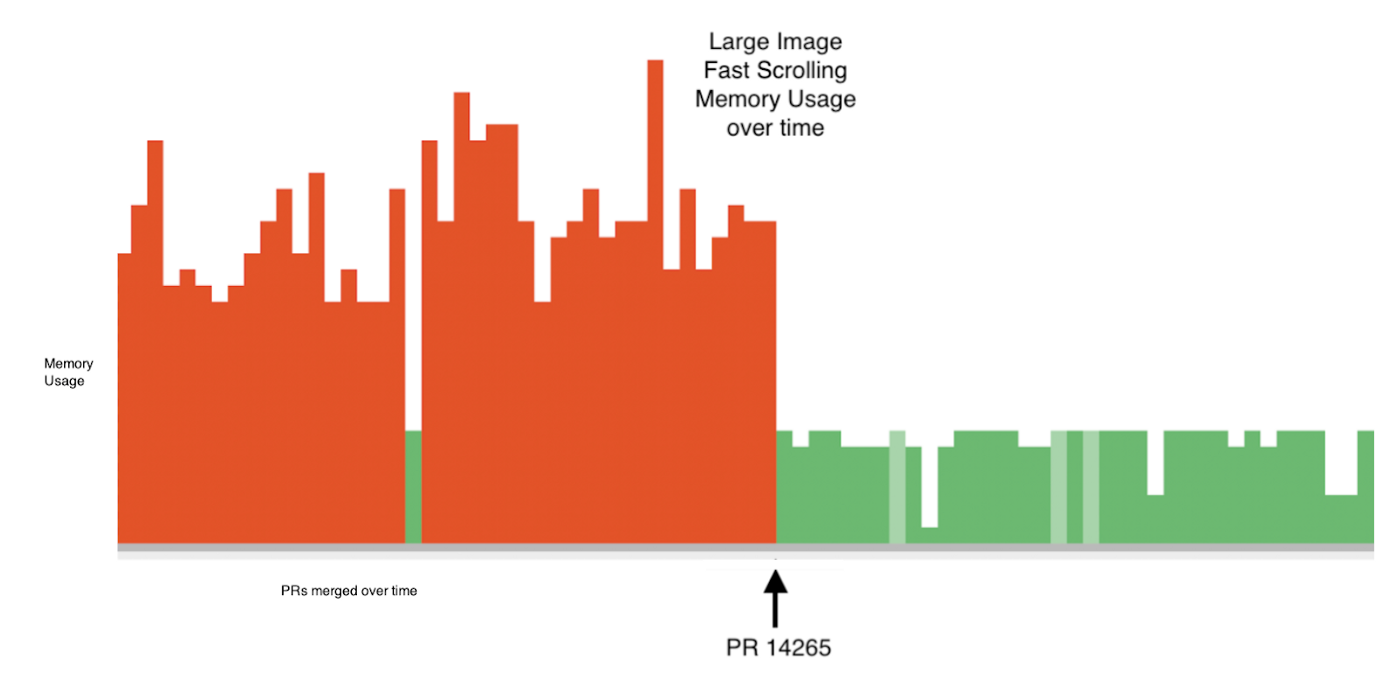
1.17对于加载大量图片的处理进行了优化,在快速滑动的过程中可以得到更好的性能提升(通过延时清理 IO Thread 的 Context),这样理论上可以在原本基础上节省出 70% 的内存。
|
|||
|
|
|
|||
|
|
|
|||
|
|
|
|||
|
|
好了,这一期想聊的聊完了,最后容我“厚颜无耻”地推广下鄙人最近刚刚上架的新书 **《Flutter 开发实战详解》,感兴趣的小伙伴可以通过以下地址了解:**
|
|||
|
|
|
|||
|
|
- **京东:https://item.jd.com/12883054.html**
|
|||
|
|
|
|||
|
|
- **当当:http://product.dangdang.com/28558519.html**
|
|||
|
|
|
|||
|
|
|
|||
|
|

|