192 lines
9.5 KiB
Markdown
192 lines
9.5 KiB
Markdown
|
|
# Flutter 小技巧之 3.7 性能优化background isolate
|
|||
|
|
|
|||
|
|
Flutter 3.7 的 background isolate 绝对是一大惊喜,尽管它在 [release note](https://juejin.cn/post/7192468840016511034#heading-10) 里被一笔带过 ,但是某种程度上它可以说是 3.7 里最实用的存在:**因为使用简单,提升又直观**。
|
|||
|
|
|
|||
|
|
> Background isolate YYDS
|
|||
|
|
|
|||
|
|
## 前言
|
|||
|
|
|
|||
|
|
我们知道 Dart 里可以通过新建 isolate 来执行”真“异步任务,而本身我们的 Dart 代码也是运行在一个独立的 isolate 里(简称 root isolate),而 isolate 之间不共享内存,只能通过消息传递在 isolates 之间交换状态。
|
|||
|
|
|
|||
|
|
> 所以 Dart 里不像 Java 一样需要线程锁。
|
|||
|
|
|
|||
|
|
而在 Dart 2.15 里新增了 isolate groups 的概念,**isolate groups 中的 isolate 共享程序里的各种内部数据结构**,也就是虽然 isolate groups 还是不允许 isolate 之间共享可变对象,但 groups 可以通过共享堆来实现结构共享,例如:
|
|||
|
|
|
|||
|
|
> Dart 2.15 后可以将对象直接从一个 isolate 传递到另一 isolate,而在此之前只支持基础数据类型。
|
|||
|
|
|
|||
|
|
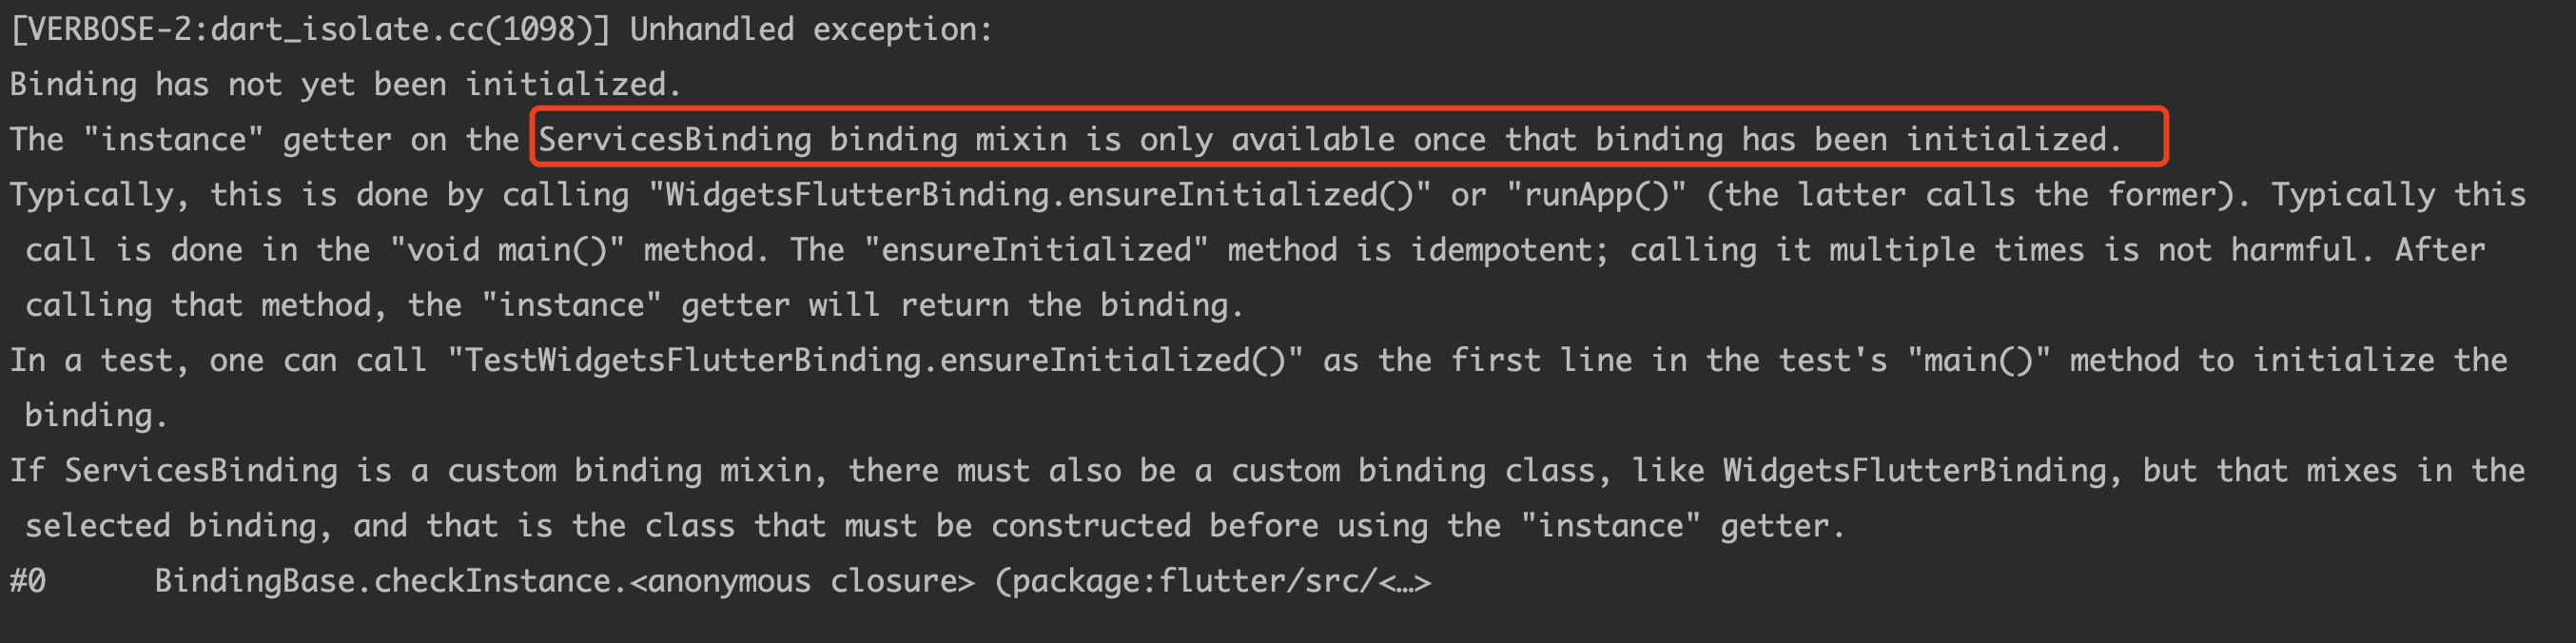
那么如果使用场景来到 Flutter Plugin ,**在 Flutter 3.7 之前,我们只能从 root isolate 去调用 Platform Channels** ,如果你尝试从其他 isolate 去调用 Platform Channels ,就会收获这样的错误警告:
|
|||
|
|
|
|||
|
|
|
|||
|
|
|
|||
|
|
> 例如,在 Flutter 3.7 之前,Platform Channels 是和 `_DefaultBinaryMessenger ` 这个全局对象进行通信,但是一但切换了 isolate ,它就会变为 null ,因为 isolate 之间不共享内存。
|
|||
|
|
|
|||
|
|
而从 Flutter 3.7 开始,简单地说,Flutter 会通过新增的 BinaryMessenger 来实现非 root isolate 也可以和 Platform Channels 直接通信,例如:
|
|||
|
|
|
|||
|
|
> 我们可以在全新的 isolate 里,通过 Platform Channels 获取到平台上的原始图片后,在这个独立的 isolate 进行一些数据处理,然后再把数据返回给 root isolate ,这样数据处理逻辑既可以实现跨平台通用,又不会卡顿 root isolate 的运行。
|
|||
|
|
|
|||
|
|
|
|||
|
|
|
|||
|
|
# Background isolate
|
|||
|
|
|
|||
|
|
现在 Flutter 在 Flutter 3.7 里引入了 `RootIsolateToken` 和 `BackgroundIsolateBinaryMessenger` 两个对象,当 background isolate 调用 Platform Channels 时, background isolate 需要和 root isolate 建立关联,所以在 API 使用上大概会是如下代码所示:
|
|||
|
|
|
|||
|
|
```dart
|
|||
|
|
RootIsolateToken rootIsolateToken =
|
|||
|
|
RootIsolateToken.instance!;
|
|||
|
|
|
|||
|
|
Isolate.spawn((rootIsolateToken) {
|
|||
|
|
doFind2(rootIsolateToken);
|
|||
|
|
}, rootIsolateToken);
|
|||
|
|
|
|||
|
|
doFind2(RootIsolateToken rootIsolateToken) {
|
|||
|
|
// Register the background isolate with the root isolate.
|
|||
|
|
BackgroundIsolateBinaryMessenger
|
|||
|
|
.ensureInitialized(rootIsolateToken);
|
|||
|
|
//......
|
|||
|
|
}
|
|||
|
|
```
|
|||
|
|
|
|||
|
|
通过 `RootIsolateToken` 的单例,我们可以获取到当前 root isolate 的 Token ,然后在调用 Platform Channels 之前通过 `ensureInitialized` 将 background isolate 需要和 root isolate 建立关联。
|
|||
|
|
|
|||
|
|
> 大概就是 token 会被注册到 `DartPluginRegistrant` 里,然后 `BinaryMessenger` 在 `_findBinaryMessenger` 时会通过 `BackgroundIsolateBinaryMessenger.instance` 发送到对应的 `listener`。
|
|||
|
|
|
|||
|
|
完整代码如下所示,逻辑也很简单,就是在 root isolate 里获取 `RootIsolateToken` ,然后在调用 Platform Channels 之前 `ensureInitialized` 关联 Token 。
|
|||
|
|
|
|||
|
|
```dart
|
|||
|
|
InkWell(
|
|||
|
|
onTap: () {
|
|||
|
|
///获取 Token
|
|||
|
|
RootIsolateToken rootIsolateToken =
|
|||
|
|
RootIsolateToken.instance!;
|
|||
|
|
Isolate.spawn(doFind, rootIsolateToken);
|
|||
|
|
},
|
|||
|
|
|
|||
|
|
////////////////
|
|||
|
|
|
|||
|
|
doFind(rootIsolateToken) async {
|
|||
|
|
/// 注册 root isolaote
|
|||
|
|
BackgroundIsolateBinaryMessenger.ensureInitialized(rootIsolateToken);
|
|||
|
|
|
|||
|
|
///获取 sharedPreferencesSet 的 isDebug 标识位
|
|||
|
|
final Future<void> sharedPreferencesSet = SharedPreferences.getInstance()
|
|||
|
|
.then((sharedPreferences) => sharedPreferences.setBool('isDebug', true));
|
|||
|
|
/// 获取本地目录
|
|||
|
|
final Future<Directory> tempDirFuture = path_provider.getTemporaryDirectory();
|
|||
|
|
|
|||
|
|
/// 合并执行
|
|||
|
|
var values = await Future.wait([sharedPreferencesSet, tempDirFuture]);
|
|||
|
|
|
|||
|
|
final Directory? tempDir = values[1] as Directory?;
|
|||
|
|
final String dbPath = path.join(tempDir!.path, 'database.db');
|
|||
|
|
File file = File(dbPath);
|
|||
|
|
if (file.existsSync()) {
|
|||
|
|
///读取文件
|
|||
|
|
RandomAccessFile reader = file.openSync();
|
|||
|
|
List<int> buffer = List.filled(256, 0);
|
|||
|
|
while (reader.readIntoSync(buffer) == 256) {
|
|||
|
|
List<int> foo = buffer.takeWhile((value) => value != 0).toList();
|
|||
|
|
///读取结果
|
|||
|
|
String string = utf8.decode(foo);
|
|||
|
|
print("######### $string");
|
|||
|
|
}
|
|||
|
|
reader.closeSync();
|
|||
|
|
}
|
|||
|
|
}
|
|||
|
|
|
|||
|
|
```
|
|||
|
|
|
|||
|
|
> 这里之所以可以在 isolate 里直接传递 `RootIsolateToken` ,就是得益于前面所说的 Dart 2.15 的 isolate groups
|
|||
|
|
|
|||
|
|
其实入下代码所示,上面的实现换成 `compute` 也可以正常执行,当然,**如果是 `compute` 的话,有一些比较特殊情况需要注意**。
|
|||
|
|
|
|||
|
|
```dart
|
|||
|
|
RootIsolateToken rootIsolateToken = RootIsolateToken.instance!;
|
|||
|
|
compute(doFind, rootIsolateToken);
|
|||
|
|
```
|
|||
|
|
|
|||
|
|
如下代码所示, `doFind2` 方法在 `doFind` 的基础上,将 `Future.wait` 的 `await` 修改为 `.then` 去执行,如果这时候你再调用 `spawn` 和 `compute` ,你就会发现 **`spawn` 下代码依然可以正常执行,但是 `compute` 却不再正常执行**。
|
|||
|
|
|
|||
|
|
```dart
|
|||
|
|
onTap: () {
|
|||
|
|
RootIsolateToken rootIsolateToken =
|
|||
|
|
RootIsolateToken.instance!;
|
|||
|
|
compute(doFind2, rootIsolateToken);
|
|||
|
|
},
|
|||
|
|
|
|||
|
|
onTap: () {
|
|||
|
|
RootIsolateToken rootIsolateToken =
|
|||
|
|
RootIsolateToken.instance!;
|
|||
|
|
Isolate.spawn(doFind2, rootIsolateToken);
|
|||
|
|
},
|
|||
|
|
|
|||
|
|
|
|||
|
|
doFind2(rootIsolateToken) async {
|
|||
|
|
/// 注册 root isolaote
|
|||
|
|
BackgroundIsolateBinaryMessenger.ensureInitialized(rootIsolateToken);
|
|||
|
|
|
|||
|
|
///获取 sharedPreferencesSet 的 isDebug 标识位
|
|||
|
|
final Future<void> sharedPreferencesSet = SharedPreferences.getInstance()
|
|||
|
|
.then((sharedPreferences) => sharedPreferences.setBool('isDebug', true));
|
|||
|
|
|
|||
|
|
/// 获取本地目录
|
|||
|
|
final Future<Directory> tempDirFuture = path_provider.getTemporaryDirectory();
|
|||
|
|
|
|||
|
|
|
|||
|
|
///////////////////// Change Here //////////////////
|
|||
|
|
/// 合并执行
|
|||
|
|
Future.wait([sharedPreferencesSet, tempDirFuture]).then((values) {
|
|||
|
|
final Directory? tempDir = values[1] as Directory?;
|
|||
|
|
final String dbPath = path.join(tempDir!.path, 'database.db');
|
|||
|
|
///读取文件
|
|||
|
|
File file = File(dbPath);
|
|||
|
|
if (file.existsSync()) {
|
|||
|
|
RandomAccessFile reader = file.openSync();
|
|||
|
|
List<int> buffer = List.filled(256, 0);
|
|||
|
|
while (reader.readIntoSync(buffer) == 256) {
|
|||
|
|
List<int> foo = buffer.takeWhile((value) => value != 0).toList();
|
|||
|
|
String string = utf8.decode(foo);
|
|||
|
|
print("######### $string");
|
|||
|
|
}
|
|||
|
|
reader.closeSync();
|
|||
|
|
}
|
|||
|
|
}).catchError((e) {
|
|||
|
|
print(e);
|
|||
|
|
});
|
|||
|
|
}
|
|||
|
|
```
|
|||
|
|
|
|||
|
|
为什么会这样?`compute` 不就是 Flutter 针对 `Isolate.spawn` 的简易封装吗?
|
|||
|
|
|
|||
|
|
> 其实原因就在这个封装上,**`compute` 现在不是直接执行 `Isolate.spawn` 代码,而是执行 `Isolate.run`** ,而 `Isolate.run` 针对 `Isolate.spawn` 做了一些特殊封装。
|
|||
|
|
|
|||
|
|
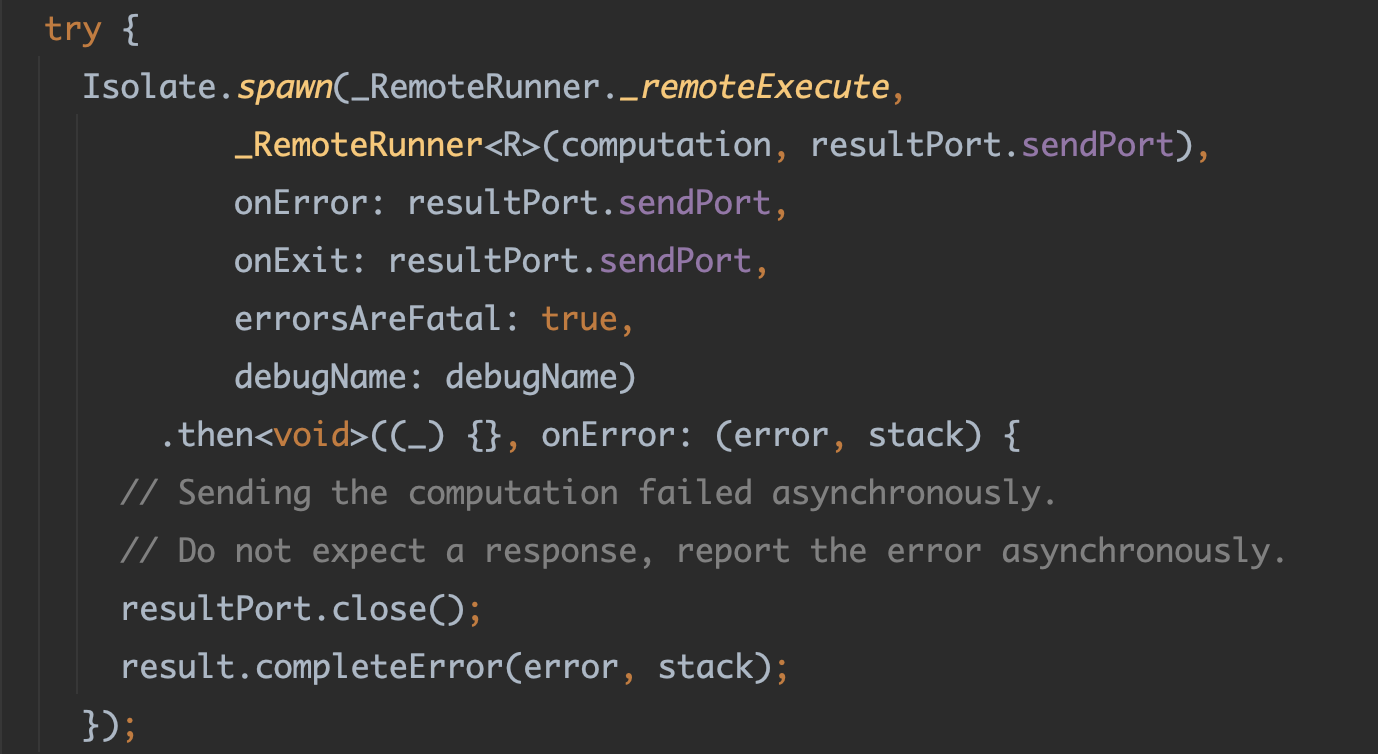
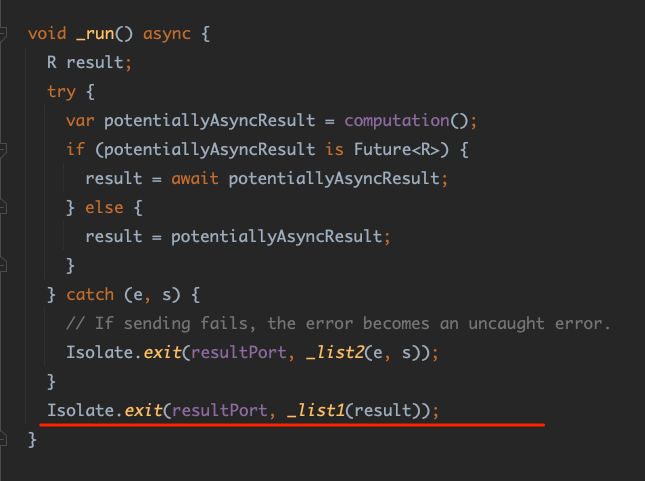
`compute` 内部会将执行对象封装成 `_RemoteRunner` 再交给 `Isolate.spawn` 执行,而 `_RemoteRunner` 在执行时,会在最后强制调用 `Isolate.exit` ,这就会导致前面的 `Future.wait` 还没执行,而 `Isolate` 就退出了,从而导致代码无效的原因。
|
|||
|
|
|
|||
|
|
|
|||
|
|
|
|||
|
|
|
|||
|
|
|
|||
|
|
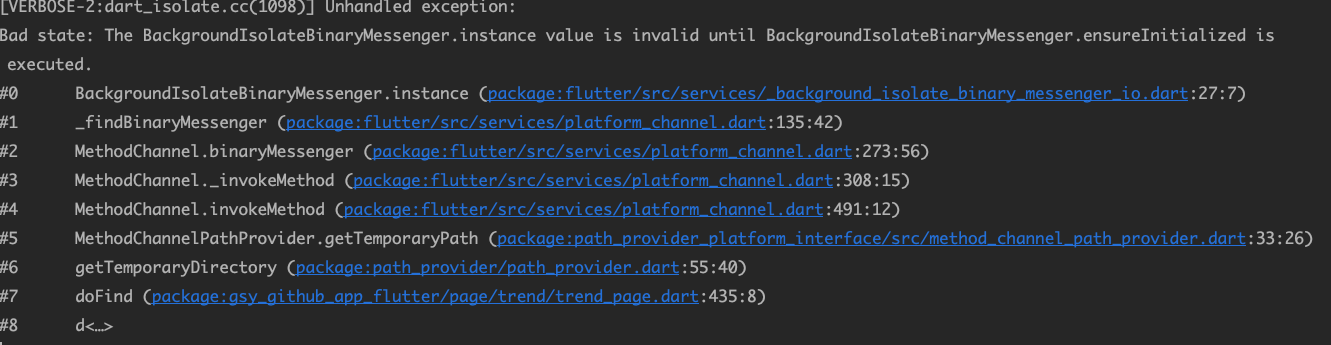
另外在 Flutter 3.7 上 ,如果 background isolate 调用 Platform Channels 没有关联 root isolate,也能看到错误提示你初始化关联,所以这也是为什么我说它使用起来很简单的原因。
|
|||
|
|
|
|||
|
|
|
|||
|
|
|
|||
|
|
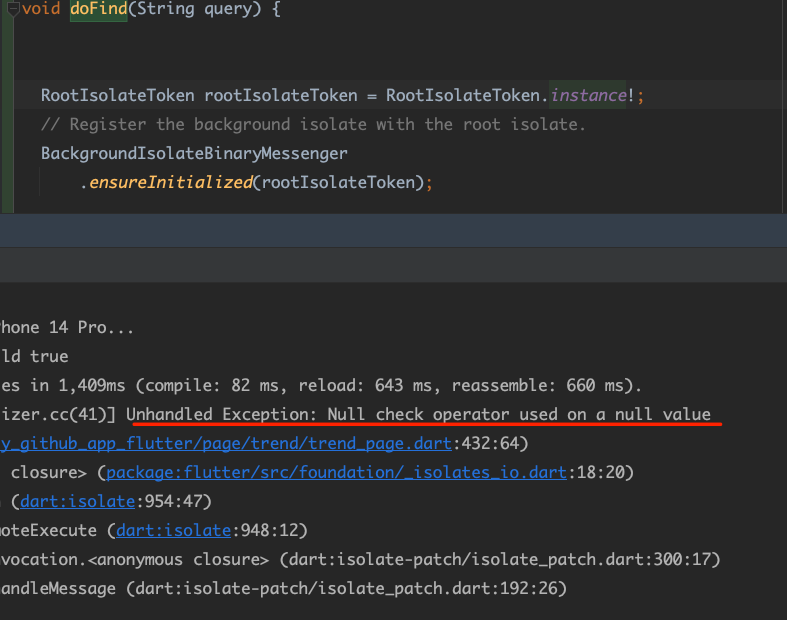
除此之外,最近刚好遇到有“机智”的小伙伴说 background isolate 无法正常调用,看了下代码是把 `RootIsolateToken.instance!;` 写到了 background isolate 执行的方法里。
|
|||
|
|
|
|||
|
|
|
|||
|
|
|
|||
|
|
> 你猜如果这样有效,为什么官方不直接把这个获取写死在 framewok?
|
|||
|
|
|
|||
|
|
其实这也是 isolates 经常引起歧义的原因,isolates 是隔离,内存不共享数据,所以 root isolate 里的 `RootIsolateToken` 在 background isolate 里直接获肯定是 null ,所以这也是 isolate 使用时需要格外注意的一些小细节。
|
|||
|
|
|
|||
|
|
> 另外还有如 [#36983](https://github.com/dart-lang/sdk/issues/36983 ) 等问题,也推动了前面所说的 `compute` 相关的更改。
|
|||
|
|
|
|||
|
|
最后,如果需要一个完整 Demo 的话,可以参考官方的 [background_isolate_channels](https://github.com/flutter/samples/tree/294ea4ff8fce588f332e82e3ee97fa3d3429c9a4/background_isolate_channels) ,项目里主要通过 `SimpleDatabase` 和 `_SimpleDatabaseServer` 的交互,来模拟展示 root isolate 和 background isolate 的调用实现。
|
|||
|
|
|
|||
|
|
# 最后
|
|||
|
|
|
|||
|
|
总的来说 background isolate 并不难理解,自从 2018 年在 [issue #13937](https://github.com/flutter/flutter/issues/13937) 被提出之后就饱受关注,甚至官方还建议过大家通过 ffi 另辟蹊径去实现,当时的 issue 也被搭上了` P5` 的 Tag。
|
|||
|
|
|
|||
|
|
> 相信大家都知道 P5 意味着什么。
|
|||
|
|
|
|||
|
|
所以 background isolate 能在 Flutter 3.7 看到是相当难得的,当然这也离不开 Dart 的日益成熟的支持,同时 background isolate 也给我们带来了更多的可能性,其中最直观就是性能优化上多了新的可能,代码写起来也变得更顺畅。
|
|||
|
|
|
|||
|
|
期待 Flutter 和 Dart 在后续的版本中还能给我们带来更多的惊喜。
|