440 lines
16 KiB
Markdown
440 lines
16 KiB
Markdown
|
|
|
|||
|
|
作为系列文章的第四篇,本篇主要介绍 Flutter 中 Redux 的使用,并结合Redux 完成实时的**主题切换**与**多语言切换**功能。
|
|||
|
|
|
|||
|
|
## 文章汇总地址:
|
|||
|
|
|
|||
|
|
> [Flutter 完整实战实战系列文章专栏](https://juejin.im/collection/5db25bcff265da06a19a304e)
|
|||
|
|
>
|
|||
|
|
> [Flutter 番外的世界系列文章专栏](https://juejin.im/collection/5db25d706fb9a069f422c374)
|
|||
|
|
|
|||
|
|
Flutter 作为**响应式框架**,通过 `state` 实现跨帧渲染的逻辑,难免让人与 *React* 和 *React Native* 联系起来,而其中 *React* 下*“广为人知”*的 **Redux 状态管理**,其实在 Flutter 中同样适用。
|
|||
|
|
|
|||
|
|
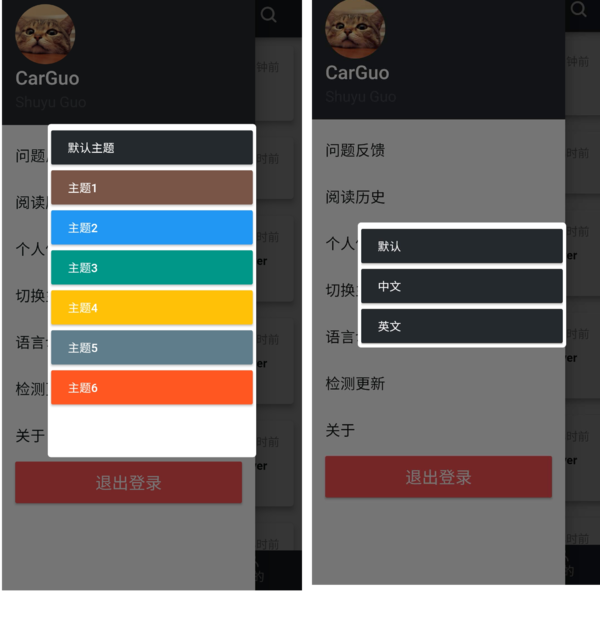
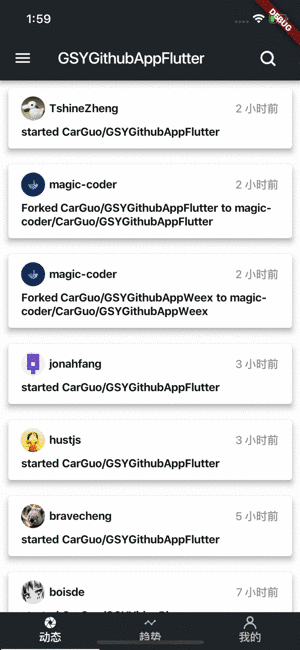
我们最终将实现如下图的效果,相应代码在 [GSYGithubAppFlutter](https://github.com/CarGuo/GSYGithubAppFlutter) 中可找到,本篇 Flutter 中所使用的 Redux 库是 [flutter_redux](https://pub.flutter-io.cn/packages/flutter_redux) 。
|
|||
|
|
|
|||
|
|
|
|||
|
|
|
|||
|
|
|
|||
|
|
|
|||
|
|
|
|||
|
|
|
|||
|
|
## 一、Redux
|
|||
|
|
|
|||
|
|
Redux 的概念是**状态管理**,那在已有 `state` 的基础上,为什么还需要 Redux ?因为使用 Redux 的好处是:**共享状态**和**单一数据**。
|
|||
|
|
|
|||
|
|
试想一下,App内有多个地方使用到登陆用户的数据,这时候如果某处对用户数据做了修改,各个页面的同步更新会是一件麻烦的事情。
|
|||
|
|
|
|||
|
|
但是引入 Redux 后,某个页面修改了当前用户信息,所有绑定了 Redux 的控件,将由 Redux 自动同步刷新。See!这在一定程度节省了我们的工作量,并且单一数据源在某些场景下也方便管理,同理我们后面所说的 *主题* 和 *多语言* 切换也是如此。
|
|||
|
|
|
|||
|
|
|
|||
|
|
|
|||
|
|
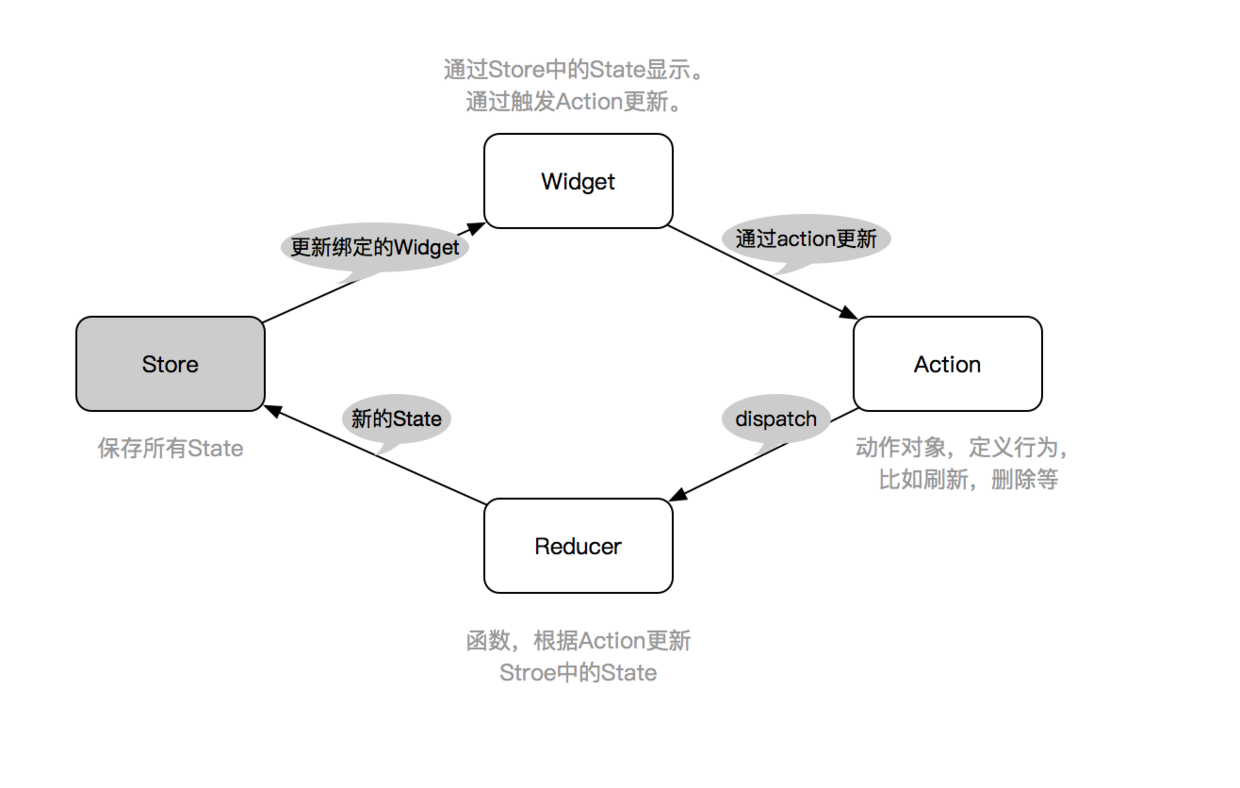
如上图,Redux 的主要由三部分组成:**Store 、Action 、 Reducer** 。
|
|||
|
|
|
|||
|
|
* Action 用于定义一个数据变化的请求行为。
|
|||
|
|
* Reducer 用于根据 Action 产生新状态,一般是一个方法。
|
|||
|
|
* Store 用于存储和管理 state。
|
|||
|
|
|
|||
|
|
所以一般流程为:
|
|||
|
|
|
|||
|
|
1、Widget 绑定了 Store 中的 state 数据。
|
|||
|
|
|
|||
|
|
2、Widget 通过 Action 发布一个动作。
|
|||
|
|
|
|||
|
|
3、Reducer 根据 Action 更新 state。
|
|||
|
|
|
|||
|
|
4、更新 Store 中 state 绑定的 Widget。
|
|||
|
|
|
|||
|
|
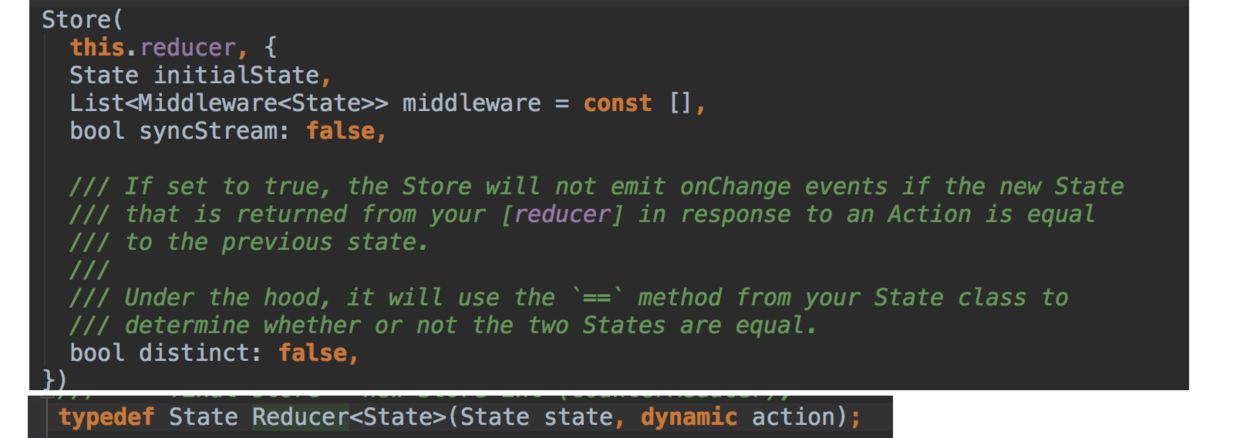
根据这个流程,首先我们要创建一个 **Store** 。如下图,创建 Store 需要 `reducer` ,而 `reducer` 实际上是一个带有 `state` 和 `action` 的方法,并返回新的 State 。
|
|||
|
|
|
|||
|
|
|
|||
|
|
|
|||
|
|
|
|||
|
|
所以我们需要先创建一个 State 对象 `GSYState` 类,用于储存需要共享的数据。比如下方代码的: *用户信息、主题、语言环境* 等。
|
|||
|
|
|
|||
|
|
接着我们需要定义 Reducer 方法 `appReducer ` :将 `GSYState ` 内的每一个参数,和对应的 `action` 绑定起来,返回完整的 `GSYState` 。**这样我们就确定了 State 和 Reducer 用于创建 Store**。
|
|||
|
|
|
|||
|
|
```
|
|||
|
|
///全局Redux store 的对象,保存State数据
|
|||
|
|
class GSYState {
|
|||
|
|
///用户信息
|
|||
|
|
User userInfo;
|
|||
|
|
|
|||
|
|
///主题
|
|||
|
|
ThemeData themeData;
|
|||
|
|
|
|||
|
|
///语言
|
|||
|
|
Locale locale;
|
|||
|
|
|
|||
|
|
///构造方法
|
|||
|
|
GSYState({this.userInfo, this.themeData, this.locale});
|
|||
|
|
}
|
|||
|
|
|
|||
|
|
///创建 Reducer
|
|||
|
|
///源码中 Reducer 是一个方法 typedef State Reducer<State>(State state, dynamic action);
|
|||
|
|
///我们自定义了 appReducer 用于创建 store
|
|||
|
|
GSYState appReducer(GSYState state, action) {
|
|||
|
|
return GSYState(
|
|||
|
|
///通过自定义 UserReducer 将 GSYState 内的 userInfo 和 action 关联在一起
|
|||
|
|
userInfo: UserReducer(state.userInfo, action),
|
|||
|
|
|
|||
|
|
///通过自定义 ThemeDataReducer 将 GSYState 内的 themeData 和 action 关联在一起
|
|||
|
|
themeData: ThemeDataReducer(state.themeData, action),
|
|||
|
|
|
|||
|
|
///通过自定义 LocaleReducer 将 GSYState 内的 locale 和 action 关联在一起
|
|||
|
|
locale: LocaleReducer(state.locale, action),
|
|||
|
|
);
|
|||
|
|
}
|
|||
|
|
|
|||
|
|
```
|
|||
|
|
|
|||
|
|
如上代码,**GSYState** 的每一个参数,是通过独立的自定义 **Reducer** 返回的。比如 `themeData ` 是通过 `ThemeDataReducer ` 方法产生的,`ThemeDataReducer ` 其实是将 `ThemeData ` 和一系列 Theme 相关的 **Action** 绑定起来,用于和其他参数分开。**这样就可以独立的维护和管理 GSYState 中的每一个参数。**
|
|||
|
|
|
|||
|
|
继续上面流程,如下代码所示,通过 *flutter_redux* 的 `combineReducers` 与 `TypedReducer `,将 `RefreshThemeDataAction` 类 和 `_refresh` 方法绑定起来,最终会返回一个 `ThemeData ` 实例。也就是说:**用户每次发出一个 RefreshThemeDataAction ,最终都会触发 _refresh 方法,然后更新 GSYState 中的 themeData**。
|
|||
|
|
|
|||
|
|
```
|
|||
|
|
import 'package:flutter/material.dart';
|
|||
|
|
import 'package:redux/redux.dart';
|
|||
|
|
|
|||
|
|
///通过 flutter_redux 的 combineReducers,创建 Reducer<State>
|
|||
|
|
final ThemeDataReducer = combineReducers<ThemeData>([
|
|||
|
|
///将Action,处理Action动作的方法,State绑定
|
|||
|
|
TypedReducer<ThemeData, RefreshThemeDataAction>(_refresh),
|
|||
|
|
]);
|
|||
|
|
|
|||
|
|
///定义处理 Action 行为的方法,返回新的 State
|
|||
|
|
ThemeData _refresh(ThemeData themeData, action) {
|
|||
|
|
themeData = action.themeData;
|
|||
|
|
return themeData;
|
|||
|
|
}
|
|||
|
|
|
|||
|
|
///定义一个 Action 类
|
|||
|
|
///将该 Action 在 Reducer 中与处理该Action的方法绑定
|
|||
|
|
class RefreshThemeDataAction {
|
|||
|
|
|
|||
|
|
final ThemeData themeData;
|
|||
|
|
|
|||
|
|
RefreshThemeDataAction(this.themeData);
|
|||
|
|
}
|
|||
|
|
|
|||
|
|
```
|
|||
|
|
|
|||
|
|
OK,现在我们可以愉悦的创建 **Store** 了。如下代码所示,在创建 Store 的同时,我们通过 `initialState` 对 GSYState 进行了初始化,然后通过 `StoreProvider ` 加载了 Store 并且包裹了 `MaterialApp ` 。 **至此我们完成了 Redux 中的初始化构建。**
|
|||
|
|
|
|||
|
|
```
|
|||
|
|
void main() {
|
|||
|
|
runApp(new FlutterReduxApp());
|
|||
|
|
}
|
|||
|
|
|
|||
|
|
class FlutterReduxApp extends StatelessWidget {
|
|||
|
|
/// 创建Store,引用 GSYState 中的 appReducer 创建 Reducer
|
|||
|
|
/// initialState 初始化 State
|
|||
|
|
final store = new Store<GSYState>(
|
|||
|
|
appReducer,
|
|||
|
|
initialState: new GSYState(
|
|||
|
|
userInfo: User.empty(),
|
|||
|
|
themeData: new ThemeData(
|
|||
|
|
primarySwatch: GSYColors.primarySwatch,
|
|||
|
|
),
|
|||
|
|
locale: Locale('zh', 'CH')),
|
|||
|
|
);
|
|||
|
|
|
|||
|
|
FlutterReduxApp({Key key}) : super(key: key);
|
|||
|
|
|
|||
|
|
@override
|
|||
|
|
Widget build(BuildContext context) {
|
|||
|
|
/// 通过 StoreProvider 应用 store
|
|||
|
|
return new StoreProvider(
|
|||
|
|
store: store,
|
|||
|
|
child: new MaterialApp(),
|
|||
|
|
);
|
|||
|
|
}
|
|||
|
|
}
|
|||
|
|
```
|
|||
|
|
|
|||
|
|
And then,接下来就是使用了。如下代码所示,通过在 `build` 中使用 `StoreConnector ` ,通过 `converter ` 转化 **store.state** 的数据,最后通过 `builder ` 返回实际需要渲染的控件,这样就完成了**数据和控件的绑定**。当然,你也可以使用`StoreBuilder` 。
|
|||
|
|
|
|||
|
|
```
|
|||
|
|
class DemoUseStorePage extends StatelessWidget {
|
|||
|
|
@override
|
|||
|
|
Widget build(BuildContext context) {
|
|||
|
|
///通过 StoreConnector 关联 GSYState 中的 User
|
|||
|
|
return new StoreConnector<GSYState, User>(
|
|||
|
|
///通过 converter 将 GSYState 中的 userInfo返回
|
|||
|
|
converter: (store) => store.state.userInfo,
|
|||
|
|
///在 userInfo 中返回实际渲染的控件
|
|||
|
|
builder: (context, userInfo) {
|
|||
|
|
return new Text(
|
|||
|
|
userInfo.name,
|
|||
|
|
);
|
|||
|
|
},
|
|||
|
|
);
|
|||
|
|
}
|
|||
|
|
}
|
|||
|
|
|
|||
|
|
```
|
|||
|
|
|
|||
|
|
最后,当你需要触发更新的时候,只需要如下代码即可。
|
|||
|
|
|
|||
|
|
|
|||
|
|
```
|
|||
|
|
StoreProvider.of(context).dispatch(new UpdateUserAction(newUserInfo));
|
|||
|
|
```
|
|||
|
|
|
|||
|
|
|
|||
|
|
So,或者简单的业务逻辑下,Redux 并没有什么优势,甚至显得繁琐。但是一旦框架搭起来,在复杂的业务逻辑下就会显示格外愉悦了。
|
|||
|
|
|
|||
|
|
## 二、主题
|
|||
|
|
|
|||
|
|
Flutter 中官方默认就支持主题设置,`MaterialApp ` 提供了 `theme` 参数设置主题,之后可以通过 `Theme.of(context)` 获取到当前的 `ThemeData` 用于设置控件的颜色字体等。
|
|||
|
|
|
|||
|
|
`ThemeData` 的创建提供很多参数,这里主要说 `primarySwatch` 参数。 `primarySwatch ` 是一个 **MaterialColor** 对象,内部由10种不同深浅的颜色组成,用来做主题色调再合适不过。
|
|||
|
|
|
|||
|
|
如下图和代码所示,Flutter 默认提供了很多主题色,同时我们也可以通过 `MaterialColor` 实现自定义的主题色。
|
|||
|
|
|
|||
|
|
|
|||
|
|
|
|||
|
|
```
|
|||
|
|
MaterialColor primarySwatch = const MaterialColor(
|
|||
|
|
primaryValue,
|
|||
|
|
const <int, Color>{
|
|||
|
|
50: const Color(primaryLightValue),
|
|||
|
|
100: const Color(primaryLightValue),
|
|||
|
|
200: const Color(primaryLightValue),
|
|||
|
|
300: const Color(primaryLightValue),
|
|||
|
|
400: const Color(primaryLightValue),
|
|||
|
|
500: const Color(primaryValue),
|
|||
|
|
600: const Color(primaryDarkValue),
|
|||
|
|
700: const Color(primaryDarkValue),
|
|||
|
|
800: const Color(primaryDarkValue),
|
|||
|
|
900: const Color(primaryDarkValue),
|
|||
|
|
},
|
|||
|
|
);
|
|||
|
|
```
|
|||
|
|
|
|||
|
|
那如何实现实时的主题切换呢?当然是通过 Redux 啦!
|
|||
|
|
|
|||
|
|
前面我们已经在 **GSYState** 中创建了 `themeData` ,此时将它设置给 **MaterialApp** 的 `theme` 参数,之后我们通过 dispatch 改变 `themeData ` 即可实现主题切换。
|
|||
|
|
|
|||
|
|
注意,因为你的 **MaterialApp** 也是一个 `StatefulWidget` ,如下代码所示,还需要利用 `StoreBuilder` 包裹起来,之后我们就可以通过 `dispatch` 修改主题,通过 `Theme.of(context).primaryColor` 获取主题色啦。
|
|||
|
|
|
|||
|
|
|
|||
|
|
```
|
|||
|
|
@override
|
|||
|
|
Widget build(BuildContext context) {
|
|||
|
|
/// 通过 StoreProvider 应用 store
|
|||
|
|
return new StoreProvider(
|
|||
|
|
store: store,
|
|||
|
|
child: new StoreBuilder<GSYState>(builder: (context, store) {
|
|||
|
|
return new MaterialApp(
|
|||
|
|
theme: store.state.themeData);
|
|||
|
|
}),
|
|||
|
|
);
|
|||
|
|
}
|
|||
|
|
|
|||
|
|
····
|
|||
|
|
|
|||
|
|
ThemeData themeData = new ThemeData(primarySwatch: colors[index]);
|
|||
|
|
store.dispatch(new RefreshThemeDataAction(themeData));
|
|||
|
|
|
|||
|
|
```
|
|||
|
|
|
|||
|
|
|
|||
|
|
|
|||
|
|
|
|||
|
|
|
|||
|
|
## 三、国际化
|
|||
|
|
|
|||
|
|
Flutter的国际化按照官网文件 [internationalization](https://flutterchina.club/tutorials/internationalization) 看起来稍微有些复杂,也没有提及实时切换,所以这里介绍下快速的实现。当然,少不了 Redux !
|
|||
|
|
|
|||
|
|
|
|||
|
|
|
|||
|
|
|
|||
|
|
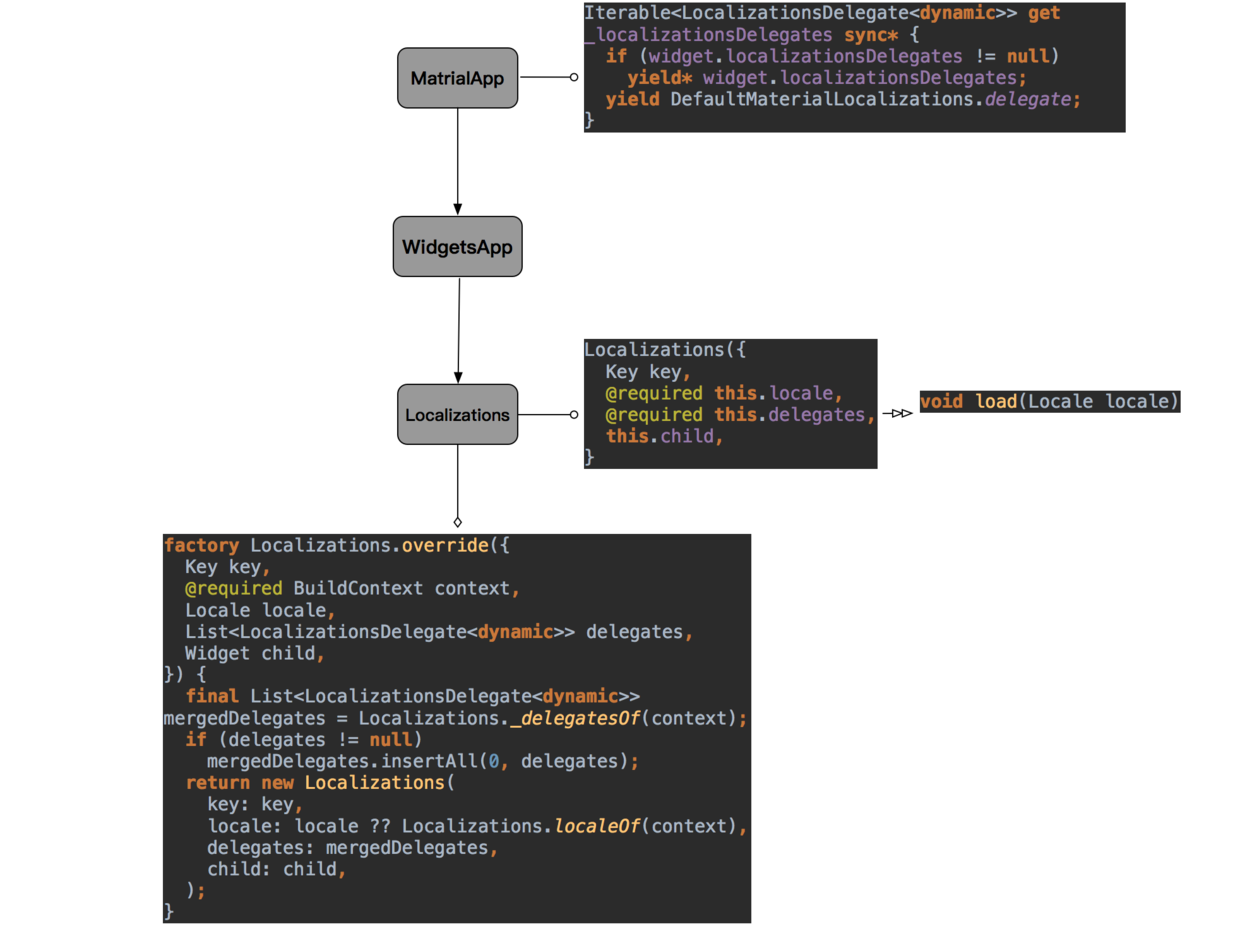
如上图所示大致流程,同样是通过默认 `MaterialApp` 设置,自定义的多语言需要实现的是: **`LocalizationsDelegate ` 和 `Localizations `**。最终流程会通过 `Localizations` 使用 `Locale` 加载这个 `delegate `。所以我们要做的是:
|
|||
|
|
|
|||
|
|
* 实现 **LocalizationsDelegate**。
|
|||
|
|
* 实现 **Localizations**。
|
|||
|
|
* 通过 **Store** 的 **Locale** 切换语言。
|
|||
|
|
|
|||
|
|
如下代码所示,创建自定义 delegate 需要继承 `LocalizationsDelegate ` 对象,其中主要实现 `load ` 方法。我们可以是通过方法的 `locale` 参数,判断需要加载的语言,然后返回我们自定义好多语言实现类 `GSYLocalizations ` ,最后通过静态 `delegate ` 对外提供 `LocalizationsDelegate `。
|
|||
|
|
|
|||
|
|
```
|
|||
|
|
/**
|
|||
|
|
* 多语言代理
|
|||
|
|
* Created by guoshuyu
|
|||
|
|
* Date: 2018-08-15
|
|||
|
|
*/
|
|||
|
|
class GSYLocalizationsDelegate extends LocalizationsDelegate<GSYLocalizations> {
|
|||
|
|
|
|||
|
|
GSYLocalizationsDelegate();
|
|||
|
|
|
|||
|
|
@override
|
|||
|
|
bool isSupported(Locale locale) {
|
|||
|
|
///支持中文和英语
|
|||
|
|
return ['en', 'zh'].contains(locale.languageCode);
|
|||
|
|
}
|
|||
|
|
|
|||
|
|
///根据locale,创建一个对象用于提供当前locale下的文本显示
|
|||
|
|
@override
|
|||
|
|
Future<GSYLocalizations> load(Locale locale) {
|
|||
|
|
return new SynchronousFuture<GSYLocalizations>(new GSYLocalizations(locale));
|
|||
|
|
}
|
|||
|
|
|
|||
|
|
@override
|
|||
|
|
bool shouldReload(LocalizationsDelegate<GSYLocalizations> old) {
|
|||
|
|
return false;
|
|||
|
|
}
|
|||
|
|
|
|||
|
|
///全局静态的代理
|
|||
|
|
static GSYLocalizationsDelegate delegate = new GSYLocalizationsDelegate();
|
|||
|
|
}
|
|||
|
|
```
|
|||
|
|
|
|||
|
|
|
|||
|
|
上面提到的 `GSYLocalizations ` 其实是一个自定义对象,如下代码所示,它会根据创建时的 `Locale` ,通过 `locale.languageCode ` 判断返回对应的语言实体:*GSYStringBase的实现类*。
|
|||
|
|
|
|||
|
|
因为 **GSYLocalizations** 对象最后会通过`Localizations` 加载,所以 `Locale ` 也是在那时,通过 delegate 赋予。同时在该 context 下,可以通过`Localizations.of ` 获取 GSYLocalizations,比如: `GSYLocalizations.of(context).currentLocalized.app_name`。
|
|||
|
|
|
|||
|
|
|
|||
|
|
```
|
|||
|
|
///自定义多语言实现
|
|||
|
|
class GSYLocalizations {
|
|||
|
|
final Locale locale;
|
|||
|
|
|
|||
|
|
GSYLocalizations(this.locale);
|
|||
|
|
|
|||
|
|
///根据不同 locale.languageCode 加载不同语言对应
|
|||
|
|
///GSYStringEn和GSYStringZh都继承了GSYStringBase
|
|||
|
|
static Map<String, GSYStringBase> _localizedValues = {
|
|||
|
|
'en': new GSYStringEn(),
|
|||
|
|
'zh': new GSYStringZh(),
|
|||
|
|
};
|
|||
|
|
|
|||
|
|
GSYStringBase get currentLocalized {
|
|||
|
|
return _localizedValues[locale.languageCode];
|
|||
|
|
}
|
|||
|
|
|
|||
|
|
///通过 Localizations 加载当前的 GSYLocalizations
|
|||
|
|
///获取对应的 GSYStringBase
|
|||
|
|
static GSYLocalizations of(BuildContext context) {
|
|||
|
|
return Localizations.of(context, GSYLocalizations);
|
|||
|
|
}
|
|||
|
|
}
|
|||
|
|
|
|||
|
|
///语言实体基类
|
|||
|
|
abstract class GSYStringBase {
|
|||
|
|
String app_name;
|
|||
|
|
}
|
|||
|
|
|
|||
|
|
///语言实体实现类
|
|||
|
|
class GSYStringEn extends GSYStringBase {
|
|||
|
|
@override
|
|||
|
|
String app_name = "GSYGithubAppFlutter";
|
|||
|
|
}
|
|||
|
|
|
|||
|
|
///使用
|
|||
|
|
GSYLocalizations.of(context).currentLocalized.app_name
|
|||
|
|
```
|
|||
|
|
|
|||
|
|
|
|||
|
|
说完了 delegate , 接下来就是 `Localizations` 了。在上面的流程图中可以看到, Localizations 提供一个 `override` 方法构建 `Localizations` ,这个方法中可以设置 locale,而我们需要的正是**实时的动态切换语言显示**。
|
|||
|
|
|
|||
|
|
如下代码,我们创建一个 `GSYLocalizations ` 的 Widget,通过 `StoreBuilder` 绑定 Store,然后通过 `Localizations.override` 包裹我们需要构建的页面,将 Store 中的 `locale` 和 Localizations 的 `locale` 绑定起来。
|
|||
|
|
|
|||
|
|
```
|
|||
|
|
class GSYLocalizations extends StatefulWidget {
|
|||
|
|
final Widget child;
|
|||
|
|
|
|||
|
|
GSYLocalizations({Key key, this.child}) : super(key: key);
|
|||
|
|
|
|||
|
|
@override
|
|||
|
|
State<GSYLocalizations> createState() {
|
|||
|
|
return new _GSYLocalizations();
|
|||
|
|
}
|
|||
|
|
}
|
|||
|
|
class _GSYLocalizations extends State<GSYLocalizations> {
|
|||
|
|
|
|||
|
|
@override
|
|||
|
|
Widget build(BuildContext context) {
|
|||
|
|
return new StoreBuilder<GSYState>(builder: (context, store) {
|
|||
|
|
///通过 StoreBuilder 和 Localizations 实现实时多语言切换
|
|||
|
|
return new Localizations.override(
|
|||
|
|
context: context,
|
|||
|
|
locale: store.state.locale,
|
|||
|
|
child: widget.child,
|
|||
|
|
);
|
|||
|
|
});
|
|||
|
|
}
|
|||
|
|
|
|||
|
|
}
|
|||
|
|
|
|||
|
|
```
|
|||
|
|
|
|||
|
|
如下代码,最后将 `GSYLocalizations ` 使用到 `MaterialApp ` 中。通过 `store.dispatch ` 切换 `Locale ` 即可。
|
|||
|
|
|
|||
|
|
```
|
|||
|
|
@override
|
|||
|
|
Widget build(BuildContext context) {
|
|||
|
|
/// 通过 StoreProvider 应用 store
|
|||
|
|
return new StoreProvider(
|
|||
|
|
store: store,
|
|||
|
|
child: new StoreBuilder<GSYState>(builder: (context, store) {
|
|||
|
|
return new MaterialApp(
|
|||
|
|
///多语言实现代理
|
|||
|
|
localizationsDelegates: [
|
|||
|
|
GlobalMaterialLocalizations.delegate,
|
|||
|
|
GlobalWidgetsLocalizations.delegate,
|
|||
|
|
GSYLocalizationsDelegate.delegate,
|
|||
|
|
],
|
|||
|
|
locale: store.state.locale,
|
|||
|
|
supportedLocales: [store.state.locale],
|
|||
|
|
routes: {
|
|||
|
|
HomePage.sName: (context) {
|
|||
|
|
///通过 Localizations.override 包裹一层。---这里
|
|||
|
|
return new GSYLocalizations(
|
|||
|
|
child: new HomePage(),
|
|||
|
|
);
|
|||
|
|
},
|
|||
|
|
});
|
|||
|
|
}),
|
|||
|
|
);
|
|||
|
|
}
|
|||
|
|
|
|||
|
|
///切换主题
|
|||
|
|
static changeLocale(Store<GSYState> store, int index) {
|
|||
|
|
Locale locale = store.state.platformLocale;
|
|||
|
|
switch (index) {
|
|||
|
|
case 1:
|
|||
|
|
locale = Locale('zh', 'CH');
|
|||
|
|
break;
|
|||
|
|
case 2:
|
|||
|
|
locale = Locale('en', 'US');
|
|||
|
|
break;
|
|||
|
|
}
|
|||
|
|
store.dispatch(RefreshLocaleAction(locale));
|
|||
|
|
}
|
|||
|
|
```
|
|||
|
|
|
|||
|
|
|
|||
|
|
|
|||
|
|
|
|||
|
|
|
|||
|
|
最后的最后,在改变时记录状态,在启动时取出后`dispatch`,至此主题和多语言设置完成。
|
|||
|
|
|
|||
|
|
|
|||
|
|
>自此,第四篇终于结束了!(///▽///)
|
|||
|
|
|
|||
|
|
### 资源推荐
|
|||
|
|
|
|||
|
|
* Github : [https://github.com/CarGuo/](https://github.com/CarGuo)
|
|||
|
|
* **开源 Flutter 完整项目:https://github.com/CarGuo/GSYGithubAppFlutter**
|
|||
|
|
* **开源 Flutter 多案例学习型项目: https://github.com/CarGuo/GSYFlutterDemo**
|
|||
|
|
* **开源 Fluttre 实战电子书项目:https://github.com/CarGuo/GSYFlutterBook**
|
|||
|
|
|
|||
|
|
##### 完整开源项目推荐:
|
|||
|
|
|
|||
|
|
* [GSYGithubAppWeex](https://github.com/CarGuo/GSYGithubAppWeex)
|
|||
|
|
* [GSYGithubApp React Native](https://github.com/CarGuo/GSYGithubApp )
|
|||
|
|
|
|||
|
|
|
|||
|
|
|
|||
|
|
|
|||
|
|

|