|
|
||
|---|---|---|
| .github | ||
| examples | ||
| pictures | ||
| src | ||
| .gitignore | ||
| Contributing.md | ||
| Contributors.md | ||
| Doxyfile | ||
| LICENSE.txt | ||
| README.md | ||
| changelog.md | ||
| keywords.txt | ||
| library.json | ||
| library.properties | ||
README.md
IRremote Arduino Library
Available as Arduino library "IRremote"
Version 3.4.0 - work in progress
![]()

![]()
![]()
This library enables you to send and receive using infra-red signals on an Arduino.
API
A Doxygen documentation of the sources is available on the project homepage.
Installation
Click on the LibraryManager badge above to see the instructions.
Supported IR Protocols
Denon / Sharp, JVC, LG, NEC / Onkyo / Apple, Panasonic / Kaseikyo, RC5, RC6, Samsung, Sony, (Pronto), BoseWave, Lego, Whynter, MagiQuest.
Protocols can be switched off and on by defining macros before the line #include <IRremote.h> like here:
#define DECODE_NEC
//#define DECODE_DENON
#include <IRremote.h>
Wiki
This is a quite old but maybe useful wiki for this library.
Features of the 3.x version
- You can use any pin for sending now, like you are used with receiving.
- Simultaneous sending and receiving. See the UnitTest example.
- No more need to use 32 bit hex values in your code. Instead a (8 bit) command value is provided for decoding (as well as an 16 bit address and a protocol number).
- Protocol values comply to protocol standards, i.e. NEC, Panasonic, Sony, Samsung and JVC decode and send LSB first.
- Supports more protocols, since adding a protocol is quite easy now.
- Better documentation and more examples :-).
- Compatible with tone() library, see ReceiveDemo.
- Supports more platforms, since the new structure allows to easily add a new platform.
- Feedback LED also for sending.
- Ability to generate a non PWM signal to just simulate an active low receiver signal for direct connect to existent receiving devices without using IR.
- Easy configuration of protocols required, directly in your [source code[(https://github.com/Arduino-IRremote/Arduino-IRremote/blob/master/examples/SimpleReceiver/SimpleReceiver.ino#L18-L34). This reduces the memory footprint and increases decoding time.
Converting your 2.x program to the 3.x version
Starting with the 3.1 version, the generation of PWM for sending is done by software, thus saving the hardware timer and enabling arbitrary output pins for sending.
If you use an (old) Arduino core that does not use the -flto flag for compile, you can activate the line #define SUPPRESS_ERROR_MESSAGE_FOR_BEGIN in IRRemote.h, if you get false error messages regarding begin() during compilation.
- Now there is an IRreceiver and IRsender object like the well known Arduino Serial object.
- Just remove the line
IRrecv IrReceiver(IR_RECEIVE_PIN);and/orIRsend IrSender;in your program, and replace all occurrences ofIRrecv.orirrecv.withIrReceiver. - Since the decoded values are now in
IrReceiver.decodedIRDataand not inresultsany more, remove the linedecode_results resultsor similar. - Like for the Serial object, call
IrReceiver.begin(IR_RECEIVE_PIN, ENABLE_LED_FEEDBACK);orIrReceiver.begin(IR_RECEIVE_PIN, DISABLE_LED_FEEDBACK);instead of theIrReceiver.enableIRIn();orirrecv.enableIRIn();in setup(). - Old
decode(decode_results *aResults)function is replaced by simpledecode(). So if you have a statementif(irrecv.decode(&results))replace it withif (IrReceiver.decode()). - The decoded result is now in in
IrReceiver.decodedIRDataand not inresultsany more, therefore replace any occurrences ofresults.valueandresults.decode_type(and similar) toIrReceiver.decodedIRData.decodedRawDataandIrReceiver.decodedIRData.protocol. - Overflow, Repeat and other flags are now in
IrReceiver.receivedIRData.flags. - Seldom used:
results.rawbufandresults.rawlenmust be replaced byIrReceiver.decodedIRData.rawDataPtr->rawbufandIrReceiver.decodedIRData.rawDataPtr->rawlen.
Do not want to convert your 2.x program and use the 3.x library version?
The 3.x versions try to be backwards compatible, so you can easily run your old examples. But some functions like e.g. sendNEC() -see below- could not made backwards compatible,
so in this cases you must revisit your code and adapt it to the 3.x library.
If you program look like:
IRrecv irrecv(RECV_PIN);
decode_results results;

void setup()
{
...
  irrecv.enableIRIn(); // Start the receiver
}

void loop() {
  if (irrecv.decode(&results)) {
      Serial.println(results.value, HEX);
      ...
      irrecv.resume(); // Receive the next value
  }
  ...
}
it runs on the 3.x version as before. But only the following decoders are available then: Denon, JVC, LG, NEC, Panasonic, RC5, RC6, Samsung, Sony.
The results.value is set by the decoders for NEC, Panasonic, Sony, Samsung and JVC as MSB first like in 2.x!
- The old functions
sendNEC()andsendJVC()are deprecated and renamed tosendNECMSB()andsendJVCMSB()to make it clearer that they send data with MSB first, which is not the standard for NEC and JVC. Use them to send your old MSB-first 32 bit IR data codes. In the new version you will send NEC (and other) commands not by 32 bit codes but by a (constant) 8 bit address and an 8 bit command.
How to convert old MSB first 32 bit IR data codes to new LSB first 32 bit IR data codes
For the new decoders for NEC, Panasonic, Sony, Samsung and JVC, the result IrReceiver.decodedIRData.decodedRawData is now LSB-first, as the definition of these protocols suggests!
To convert one into the other, you must reverse the byte/nibble positions and then reverse all bit positions of each byte/nibble or write it as one binary string and reverse/mirror it.
Example:
- 0xCB340102 byte reverse -> 02 01 34 CB. Bit reverse of byte -> 40 80 2C D3.
- 0xCB340102 nibble reverse -> 201043BC. Bit reverse of nibble -> 40802CD3.
Nibble reverse map: | 1->8 | 2->4 | 3->C | 4->2 | 5->A | 6->6 | 7->E | 8->1 | 9->9 | A->5 | B->D | C->3 | D->B | E->7 | F->F | - 0xCB340102 is binary 11001011001101000000000100000010.
0x40802CD3 is binary 01000000100000000010110011010011.
If you read the first binary sequence backwards (right to left), you get the second sequence.
Sending IR codes
Please do not use the old send*Raw() functions for sending like e.g. IrSender.sendNECRaw(0xE61957A8,2),
even if this functions are used in a lot of (old) tutorials. They are only kept for backward compatibility and unsupported and error prone.
Much better is to use the new structured functions with address and command parameters like e.g. IrSender.sendNEC(0xA8, 0x19, 2).
Especially if you are able to receive these remote codes and get the address and command values.
You will discover that the address is a constant and the commands sometimes are sensibly grouped.
FAQ
- IR does not work right when I use Neopixels (aka WS2811/WS2812/WS2812B) or other libraries blocking interrupts for a longer time (> 50 us).
Whether you use the Adafruit Neopixel lib, or FastLED, interrupts get disabled on many lower end CPUs like the basic Arduinos for longer than 50 <20>s. In turn, this stops the IR interrupt handler from running when it needs to. There are some solutions to this on some processors, see this page from Marc MERLIN - Another library is only working if I deactivate the line
IrReceiver.begin(IR_RECEIVE_PIN, ENABLE_LED_FEEDBACK);. Please see below. - You can use multiple IR receiver by just connecting the output pins of several IR receivers together. The IR receivers use an NPN transistor as output device with just a 30k resistor to VCC. This is almost "open collector" and allows connecting of several output pins to one Arduino input pin.
- The minimal CPU frequency for receiving is 4 MHz, since the 50 us timer ISR takes around 12 us on a 16 MHz ATmega.
Minimal version
For applications only requiring NEC protocol, there is a receiver which has very small code size of 500 bytes and does NOT require any timer. See the MinimalReceiver and IRDispatcherDemo example how to use it. Mapping of pins to interrupts can be found here.
Handling unknown Protocols
Disclaimer
This library was never designed to handle long codes like the ones used by air conditioners.
See Recording long Infrared Remote control signals with Arduino.
The main reason is, that it was designed to fit inside MCUs with relatively low levels of resources and was intended to work as a library together with other applications which also require some resources of the MCU to operate.
Protocol=UNKNOWN
If you see something like Protocol=UNKNOWN Hash=0x13BD886C 35 bits received as output of e.g. the ReceiveDemo example, you either have a problem with decoding a protocol, or an unsupported protocol.
- If you have an odd number of bits received, it is likely, that your receiver circuit has problems. Maybe because the IR signal is too weak.
- If you see timings like
+ 600,- 600 + 550,- 150 + 200,- 100 + 750,- 550then one 450 <20>s space was split into two 150 and 100 <20>s spaces with a spike / error signal of 200 <20>s between. Maybe because of a defective receiver or a weak signal in conjunction with another light emitting source nearby. - If you see timings like
+ 500,- 550 + 450,- 550 + 500,- 500 + 500,-1550, then marks are generally shorter than spaces and thereforeMARK_EXCESS_MICROS(specified in your ino file) should be negative to compensate for this at decoding. - If you see
Protocol=UNKNOWN Hash=0x0 1 bits receivedit may be that the space after the initial mark is longer thanRECORD_GAP_MICROS. This was observed for some LG air conditioner protocols. Try again with a line e.g.#define RECORD_GAP_MICROS 12000before the line#include <IRremote.h>in your ino file. - To see more info supporting you to find the reason for your UNKNOWN protocol, you must enable the line
//#define DEBUGin IRremoteInt.h.
How to deal with protocols not supported by IRremote
If you do not know which protocol your IR transmitter uses, you have several choices.
- Use the IRreceiveDump example to dump out the IR timing. You can then reproduce/send this timing with the SendRawDemo example. For long codes with more than 48 bits like from air conditioners, you can change the length of the input buffer in IRremote.h.
- The IRMP AllProtocol example prints the protocol and data for one of the 40 supported protocols. The same library can be used to send this codes.
- If you have a bigger Arduino board at hand (> 100 kByte program space) you can try the IRremoteDecode example of the Arduino library DecodeIR.
- Use IrScrutinizer. It can automatically generate a send sketch for your protocol by exporting as "Arduino Raw". It supports IRremote, the old IRLib and Infrared4Arduino.
Hints
- To increase strength of sent output signal you can increase the current through the send diode, and/or use 2 diodes in series, since one IR diode requires only 1.5 volt.
- The line #include "ATtinySerialOut.h" in PinDefinitionsAndMore.h (requires the library to be installed) saves 370 bytes program space and 38 bytes RAM for Digispark boards as well as enables serial output at 8MHz.
- The default software generated PWM has problems on AVR running with 8 MHz. The PWM frequency is around 30 instead of 38 kHz and RC6 is not reliable. You can switch to timer PWM generation by
#define SEND_PWM_BY_TIMER.
Examples
In order to fit the examples to the 8K flash of ATtiny85 and ATtiny88, the Arduino library ATtinySerialOut is required for this CPU's.
SimpleReceiver + SimpleSender
This examples are a good starting point.
ReceiveDemo
Receives all protocols and play a beep on each packet received. By connecting pin 5 to ground, you can see the raw values for each packet.
SendDemo
Sends all available protocols at least once.
ReceiveAndSend + UnitTest
ReceiveDemo + SendDemo in one program. Receiving while sending.
ReceiveAndSend
Record and play back last received IR signal at button press.
SmallReceiver
If code size matters, look at these example.
MinimalReceiver
The MinimalReceiver example uses the TinyReceiver library which can only receive NEC codes, but does not require any timer.
MinimalReceiver can be tested online with WOKWI.
Click on the receiver while simulation is running to specify individual IR codes.
IRDispatcherDemo
Framework for calling different functions of your program for different IR codes.
IRrelay
Control a relay (connected to an output pin) with your remote.
IRremoteExtensionTest
Example for a user defined class, which itself uses the IRrecv class from IRremote.
SendLGAirConditionerDemo
Example for sending LG air conditioner IR codes controlled by Serial input.
By just using the function bool Aircondition_LG::sendCommandAndParameter(char aCommand, int aParameter) you can control the air conditioner by any other command source.
The file acLG.h contains the command documentation of the LG air conditioner IR protocol. Based on reverse engineering of the LG AKB73315611 remote.

ReceiverTimingAnalysis
This example analyzes the signal delivered by your IR receiver module.
Values can be used to determine the stability of the received signal as well as a hint for determining the protocol.
It also computes the MARK_EXCESS_MICROS value, which is the extension of the mark (pulse) duration introduced by the IR receiver module.
It can be tested online with WOKWI.
Click on the receiver while simulation is running to specify individual NEC IR codes.
Compile options / macros for this library
To customize the library to different requirements, there are some compile options / macros available.
Modify it by commenting them out or in, or change the values if applicable.
Or define the macro with the -D compiler option for global compile (the latter is not possible with the Arduino IDE, so consider using Sloeber.
| Name | File | Default value | Description |
|---|---|---|---|
SEND_PWM_BY_TIMER |
Before #include <IRremote.h> |
disabled | Disable carrier PWM generation in software and use (restricted) hardware PWM except for ESP32 where both modes are using the flexible hw_timer_t. |
USE_NO_SEND_PWM |
Before #include <IRremote.h> |
disabled | Use no carrier PWM, just simulate an active low receiver signal. Overrides SEND_PWM_BY_TIMER definition. |
USE_OPEN_DRAIN_OUTPUT_FOR_SEND_PIN |
Before #include <IRremote.h> |
disabled | Use or simulate open drain output mode at send pin. Attention, active state of open drain is LOW, so connect the send LED between positive supply and send pin! |
NO_LEGACY_COMPATIBILITY |
IRremoteInt.h | disabled | Disables the old decoder for version 2.x compatibility, where all protocols -especially NEC, Panasonic, Sony, Samsung and JVC- were MSB first. Saves around 60 bytes program space and 14 bytes RAM. |
EXCLUDE_EXOTIC_PROTOCOLS |
Before #include <IRremote.h> |
disabled | If activated, BOSEWAVE, MAGIQUEST,WHYNTER and LEGO_PF are excluded in decode() and in sending with IrSender.write(). Saves up to 650 bytes program space. |
EXCLUDE_UNIVERSAL_PROTOCOLS |
Before #include <IRremote.h> |
disabled | If activated, the universal decoder for pulse width or pulse distance protocols and decodeHash (special decoder for all protocols) are excluded in decode(). Saves up to 1000 bytes program space. |
MARK_EXCESS_MICROS |
Before #include <IRremote.h> |
20 | MARK_EXCESS_MICROS is subtracted from all marks and added to all spaces before decoding, to compensate for the signal forming of different IR receiver modules. |
RECORD_GAP_MICROS |
Before #include <IRremote.h> |
5000 | Minimum gap between IR transmissions, to detect the end of a protocol. Must be greater than any space of a protocol e.g. the NEC header space of 4500 us. Must be smaller than any gap between a command and a repeat; e.g. the retransmission gap for Sony is around 24 ms. Keep in mind, that this is the delay between the end of the received command and the start of decoding. |
FEEDBACK_LED_IS_ACTIVE_LOW |
Before #include <IRremote.h> |
disabled | Required on some boards (like my BluePill and my ESP8266 board), where the feedback LED is active low. |
DISABLE_LED_FEEDBACK_FOR_RECEIVE |
Before #include <IRremote.h> |
disabled | This completely disables the LED feedback code for receive, thus saving around 108 bytes program space and halving the receiver ISR processing time. |
IR_INPUT_IS_ACTIVE_HIGH |
Before #include <IRremote.h> |
disabled | Enable it if you use a RF receiver, which has an active HIGH output signal. |
RAW_BUFFER_LENGTH |
IRremoteInt.h | 101 | Buffer size of raw input buffer. Must be odd! |
DEBUG |
IRremoteInt.h | disabled | Enables lots of lovely debug output. |
IR_SEND_DUTY_CYCLE |
IRremoteInt.h | 30 | Duty cycle of IR send signal. |
MICROS_PER_TICK |
IRremoteInt.h | 50 | Resolution of the raw input buffer data. |
IR_USE_AVR_TIMER* |
private/IRTimer.hpp | Selection of timer to be used for generating IR receiving sample interval. | |
| - | - | - | - |
IR_INPUT_PIN |
TinyIRReceiver.h | 2 | The pin number for TinyIRReceiver IR input, which gets compiled in. |
IR_FEEDBACK_LED_PIN |
TinyIRReceiver.h | LED_BUILTIN |
The pin number for TinyIRReceiver feedback LED, which gets compiled in. |
DO_NOT_USE_FEEDBACK_LED |
TinyIRReceiver.h | disabled | Enable it to disable the feedback LED function. |
Modifying compile options with Arduino IDE
First, use Sketch > Show Sketch Folder (Ctrl+K).
If you did not yet stored the example as your own sketch, then you are instantly in the right library folder.
Otherwise you have to navigate to the parallel libraries folder and select the library you want to access.
In both cases the library files itself are located in the src directory.
The modification must be renewed for each new IRremote library version!
Modifying compile options with Sloeber IDE
If you are using Sloeber as your IDE, you can easily define global symbols with Properties > Arduino > CompileOptions.

Supported Boards
Digispark boards are tested with the recommended ATTinyCore using New Style pin mapping for the pro board.
- Arduino Uno / Mega / Leonardo / Duemilanove / Diecimila / LilyPad / Mini / Fio / Nano etc.
- Teensy 1.0 / 1.0++ / 2.0 / 2++ / 3.0 / 3.1 / Teensy-LC - but limited support; Credits: PaulStoffregen (Teensy Team)
- Sanguino
- ATmega8, 48, 88, 168, 328
- ATmega8535, 16, 32, 164, 324, 644, 1284,
- ATmega64, 128
- ATmega4809 (Nano every)
- ATtiny84, 85, 167 (Digispark + Digispark Pro)
- SAMD (Zero, MKR*, but not DUE, which is SAM architecture)
- ESP32
- ESP8266 This fork supports an impressive set of protocols and a lot of air conditioners
- Sparkfun Pro Micro
- Nano Every, Uno WiFi Rev2, nRF5 BBC MicroBit, Nano33_BLE
- BluePill with STM32
We are open to suggestions for adding support to new boards, however we highly recommend you contact your supplier first and ask them to provide support from their side.
Timer and pin usage
The receiver sample interval is generated by a timer. On many boards this must be a hardware timer, on some, where a software timer is available, the software timer is used.
Every pin can be used for receiving.
The code for the timer and the timer selection is located in private/IRTimer.hpp. It can be adjusted here.
Be aware that the hardware timer used for receiving should not be used for analogWrite()! See table below.
The MinimalReceiver example uses the TinyReceiver library, which can only receive NEC codes, but does not require any timer.
The send PWM signal is by default generated by software. Therefore every pin can be used for sending. The PWM pulse length is guaranteed to be constant by using delayMicroseconds(). Take care not to generate interrupts during sending with software generated PWM, otherwise you will get jitter in the generated PWM. E.g. wait for a former Serial.print() statement to be finished by Serial.flush(). Since the Arduino micros() function has a resolution of 4 us at 16 MHz, we always see a small jitter in the signal, which seems to be OK for the receivers.
Software generated PWM showing small jitter because of the limited resolution of 4 us of the Arduino core micros() function for an ATmega328 |
Detail (ATmega328 generated) showing 33% Duty cycle |
|---|---|
 |
 |
Incompatibilities to other libraries and Arduino commands like tone() and analogWrite()
If you use a library which requires the same timer as IRremote, you have a problem, since the timer resource cannot be shared simultaneously by both libraries. The best approach is to change the timer used for IRremote, which can be accomplished by modifying the timer selection in private/IRTimer.hpp.
For the AVR platform the code to modify looks like:
// Arduino Mega
#elif defined(__AVR_ATmega1280__) || defined(__AVR_ATmega2560__)
#  if !defined(IR_USE_AVR_TIMER1) && !defined(IR_USE_AVR_TIMER2) && !defined(IR_USE_AVR_TIMER3) && !defined(IR_USE_AVR_TIMER4) && !defined(IR_USE_AVR_TIMER5)
//#define IR_USE_AVR_TIMER1   // send pin = pin 11
#define IR_USE_AVR_TIMER2     // send pin = pin 9
//#define IR_USE_AVR_TIMER3   // send pin = pin 5
//#define IR_USE_AVR_TIMER4   // send pin = pin 6
//#define IR_USE_AVR_TIMER5   // send pin = pin 46
#  endif
You just have to modify the comments of the current and desired timer line.
But be aware that the new timer in turn might be incompatible with other libraries or commands.
The modification must be renewed for each new IRremote library version, or you use an IDE like Sloeber.
For other platforms you must modify the appropriate section guarded by e.g. #elif defined(ESP32).
Another approach can be to share the timer sequentially if their functionality is used only for a short period of time like for the Arduino tone() command.
An example can be seen here, where the timer settings for IR receive are restored after the tone has stopped.
For this we must call IrReceiver.start() or better IrReceiver.start().
This only works since each call to tone() completely initializes the timer 2 used by the tone() command.
Hardware-PWM signal generation for sending
If you define SEND_PWM_BY_TIMER, the send PWM signal is forced to be generated by a hardware timer. The same timer as for the receiver is used.
Since each hardware timer has its dedicated output pins, you must change timer to change PWM output.
The timer and the pin usage can be adjusted in private/IRTimer.hpp.
| Board/CPU | Hardware-PWM Pin | Receive & PWM Timers |
analogWrite() pins occupied by timer |
|---|---|---|---|
| ATtiny84 | 6 | 1 | |
| ATtiny85 > 4 MHz | 0, 4 | 0, 1 | 0, 1 & 4 |
| ATtiny88 > 4 MHz | PB1 / 8 | 1 | PB1 / 8 & PB2 / 9 |
| ATtiny167 > 4 MHz | 9 | 1 | 8 - 15 |
| ATtiny1604 | PA05 | TCB0 | |
| ATmega8 | 9 | 1 | |
| ATmega168, ATmega328 | 9, 3 | 1, 2 | 9 & 10, 3 & 11 |
| ATmega1284 | 13, 14, 6 | 1, 2, 3 | |
| ATmega164, ATmega324, ATmega644 | 13, 14 | 1, 2 | |
| ATmega8535 ATmega16, ATmega32 | 13 | 1 | |
| ATmega64, ATmega128, ATmega1281, ATmega2561 | 13 | 1 | |
| ATmega8515, ATmega162 | 13 | 1 | |
| ATmega1280, ATmega2560 | 5, 6, 9, 11, 46 | 1, 2, 3, 4, 5 | |
| ATmega4809 | A4 | TCB0 | |
| Leonardo (Atmega32u4) | 5, 9, 13 | 1, 3, 4_HS | |
| Zero (SAMD) | *, 9 | TC3 | |
| ESP32 | 4, all pins | 1 | |
| Sparkfun Pro Micro | 5, 9 | 1, 3 | |
| Teensy 1.0 | 17 | 1 | |
| Teensy 2.0 | 9, 10, 14 | 1, 3, 4_HS | |
| Teensy++ 1.0 / 2.0 | 1, 16, 25 | 1, 2, 3 | |
| Teensy 3.0 / 3.1 | 5 | CMT | |
| Teensy-LC | 16 | TPM1 | |
| BluePill / STM32F103C8T6 | % | 3 | PA6 & PA7 & PB0 & PB1 |
| BluePill / STM32F103C8T6 | % | TIM4 | PB6 & PB7 & PB8 & PB9 |
Adding new protocols
To add a new protocol is quite straightforward. Best is too look at the existing protocols to find a similar one and modify it.
As a rule of thumb, it is easier to work with a description of the protocol rather than trying to entirely reverse-engineer the protocol.
Please include a link to the description in the header, if you found one.
The durations you receive are likely to be longer for marks and shorter for spaces than the protocol suggests,
but this depends on the receiver circuit in use. Most protocols use multiples of one time-unit for marks and spaces like e.g. NEC. It's easy to be off-by-one with the last bit, since the last space is not recorded by IRremote.
Try to make use of the template functions decodePulseDistanceData() and sendPulseDistanceData().
If your protocol supports address and code fields, try to reflect this in your api like it is done in sendNEC(uint16_t aAddress, uint8_t aCommand, uint_fast8_t aNumberOfRepeats, bool aIsRepeat) and decodeNEC().
Integration
To integrate your protocol, you need to extend the two functions decode() and getProtocolString() in IRreceice.cpp,
add macros and function declarations for sending and receiving and extend the enum decode_type_t in IRremote.h.
And at least it would be wonderful if you can provide an example how to use the new protocol.
A detailed description can be found in the ir_Template.cpp file.
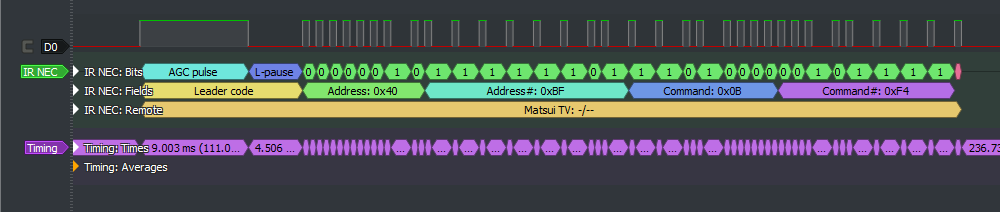
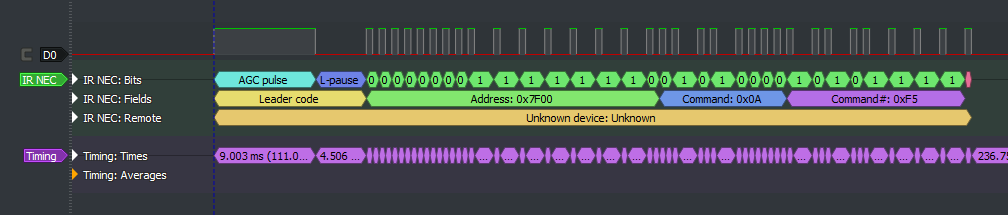
NEC encoding
Created with sigrok PulseView with IR_NEC decoder by DjordjeMandic.
8 bit address NEC code
 16 bit address NEC code
Revision History
Please see changelog.md.
API documentation
To generate the API documentation,
Doxygen, as well as Graphviz should be installed.
(Note that on Windows, it is useful to specify the installer to add Graphviz to PATH or to do it manually.
With Doxygen and Graphviz installed, issue the command
doxygen from the command line in the main project directory, which will
generate the API documentation in HTML format.
The just generated docs/index.html can now be opened in a browser.
Why do we use 33% duty cycle
We do it according to the statement in the Vishay datasheet:
- Carrier duty cycle 50 %, peak current of emitter IF = 200 mA, the resulting transmission distance is 25 m.
- Carrier duty cycle 10 %, peak current of emitter IF = 800 mA, the resulting transmission distance is 29 m. - Factor 1.16 The reason is, that it is not the pure energy of the fundamental which is responsible for the receiver to detect a signal. Due to automatic gain control and other bias effects high intensity and lower energy (duty cycle) of the 38 kHz pulse counts more than high low intensity and higher energy.
BTW, the best way to increase the IR power is to use 2 or 3 IR diodes in series. One diode requires 1.1 to 1.5 volt so you can supply 3 diodes with a 5 volt output.
To keep the current, you must reduce the resistor by (5 - 1.3) / (5 - 2.6) = 1.5 e.g. from 150 ohm to 100 ohm for 25 mA and 2 diodes with 1.3 volt and a 5 volt supply.
For 3 diodes it requires factor 2.5 e.g. from 150 ohm to 60 ohm.
Quick comparison of 4 Arduino IR receiving libraries
Here you find an ESP8266/ESP32 version of IRremote with an impressive list of supported protocols.
This is a short comparison and may not be complete or correct
I created this comparison matrix for myself in order to choose a small IR lib for my project and to have a quick overview, when to choose which library.
It is dated from 03.02.2021. If you have complains about the data or request for extensions, please send a PM or open a discussion.
| Subject | IRMP | IRLremote | IRLib2 mostly unmaintained |
IRremote | Minimal NEC |
|---|---|---|---|---|---|
| Number of protocols | 50 | Nec + Panasonic + Hash * | 12 + Hash * | 17 + Hash * | NEC |
| 3.Party libs needed | % | PinChangeInterrupt if not pin 2 or 3 | % | % | % |
| Timing method receive | Timer2 or interrupt for pin 2 or 3 | Interrupt | Timer2 or interrupt for pin 2 or 3 | Timer2 or interrupt for NEC | Interrupt |
| Timing method send | PWM and timing with Timer2 interrupts | Timer2 interrupts | Timer2 and blocking wait | PWM with Timer2 and blocking wait with delayMicroseconds() | % |
| Send pins | All | All | All ? | Timer dependent | % |
| Decode method | OnTheFly | OnTheFly | RAM | RAM | OnTheFly |
| Encode method | OnTheFly | OnTheFly | OnTheFly | OnTheFly or RAM | % |
| Callback suppport | x | % | % | % | x |
| Repeat handling | Receive + Send (partially) | % | ? | Receive + Send | x |
| LED feedback | x | % | x | x | x |
| FLASH usage (simple NEC example with 5 prints) | 1820 (4300 for 15 main / 8000 for all 40 protocols) (+200 for callback) (+80 for interrupt at pin 2+3) |
1270 (1400 for pin 2+3) |
4830 | 1770 | 900 |
| RAM usage | 52 (73 / 100 for 15 (main) / 40 protocols) |
62 | 334 | 227 | 19 |
| Supported platforms | avr, megaAVR, attiny, Digispark (Pro), esp8266, ESP32, STM32, SAMD 21, Apollo3 (plus arm and pic for non Arduino IDE) |
avr, esp8266 | avr, SAMD 21, SAMD 51 | avr, attiny, esp8266, esp32, SAM, SAMD | All platforms with attachInterrupt() |
| Last library update | 2/2021 | 4/2018 | 9/2019 | 2/2021 | 2/2021 |
| Remarks | Decodes 40 protocols concurrently. 39 Protocols to send. Work in progress. |
Only one protocol at a time. | Consists of 5 libraries. Project containing bugs - 45 issues, no reaction for at least one year. | Decoding and sending are easy to extend. Supports Pronto codes. |
Requires no timer. |
* The Hash protocol gives you a hash as code, which may be sufficient to distinguish your keys on the remote, but may not work with some protocols like Mitsubishi
Contributing
If you want to contribute to this project:
- Report bugs and errors
- Ask for enhancements
- Create issues and pull requests
- Tell other people about this library
- Contribute new protocols
Check here for some guidelines.
Contributors
Check here
License
Up to the version 2.7.0, the License is GPLv2. From the version 2.8.0, the license is the MIT license.
Copyright
Initially coded 2009 Ken Shirriff http://www.righto.com Copyright (c) 2016 Rafi Khan Copyright (c) 2020-2021 Armin Joachimsmeyer